Introduction
As Integration developers we sometimes need to implement interfaces that need to trigger specific processes or resources at certain times or schedules.
As you all know, the problem with BizTalk is that there are no out of the box solutions to develop these kind of trigger/scheduling scenarios.
There are already couple of good blog post out there that take you around the possibilities of having these kind of triggers setup on-premise.
You could for example use SQL Agent Job Scheduling, Windows Task Scheduling or the community developed Scheduled Task Adapter.
Be sure to take a look at this good overview by Michael Stephenson on following location: http://geekswithblogs.net/michaelstephenson/archive/2008/05/16/122203.aspx
The intention of this blogpost is to put another option out there: using the Microsoft Azure Scheduler to get those triggers into your BizTalk/Integration platform.
About the Azure Scheduler
The Azure Scheduler lets you create jobs in the cloud that invoke services (inside and outside Azure), it’s great for recurring actions and the jobs can run on any schedule. The Azure scheduler is a reliable cloud service and is designed to operate even in the face of network or machine failures.
More information on the Azure Scheduler can be found on following location: http://azure.microsoft.com/en-us/services/scheduler/
The Concept/Scenario
The concept I’m going to describe below is to create a canvas or scenario where the Azure Scheduler can be used in combination with BizTalk Server.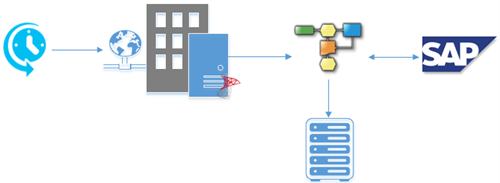
Inside our datacenter we have a SQL Server that contains all the synchronized master data from our SAP system this master data is used for daily and monthly reporting.
Next to that we have a SAP system that is used for our day to day businesses: bookings, invoices, planning…
Every night, except during the weekend our master data needs to be synchronized with the data from our SAP system.
For this synchronization we want to use a reliable scheduler option that is easy and fast to implement: the Azure Scheduler.
The Implementation
In this implementation description I’m not going to talk about the BizTalk implementation of this scenario, but rather focus on the setup necessary to get the trigger inside the BizTalk environment to trigger our synchronization flow. From a BizTalk implementation view we need a HTTP endpoint exposed on our environment. This HTTP endpoint will be triggered by the Azure Scheduler.
In this example I am hosting my endpoint on following location: http://biztalk2013glenn.cloudapp.net/BizTalkReceive/BTSHTTPReceive.dll.
If you need more information on how to create a HTTP endpoint inside BizTalk you can check following link: http://msdn.microsoft.com/en-us/library/aa561370.aspx.
Once we have our HTTP endpoint and our flow ready all we need to do is setup the Azure Scheduler to send a trigger to our endpoint and we’re good to go. In the next few steps I will show you how easy it is to create this kind of behavior.
The Azure Scheduler
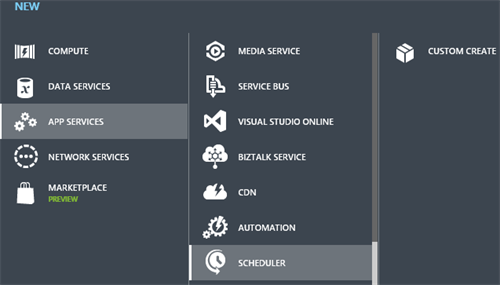
Once you’re logged in into the Azure Portal choose New – App Services – Scheduler – Custom Create.
Once you clicked custom create following screen will popup.
In this screen you will need to specify your Region and the Job Collection you want to have your Scheduling Job associated with.
If you do not have any Job Collection yet, you can create a new one by specifying a specific name.
Click on the arrow to continue creating the scheduling job.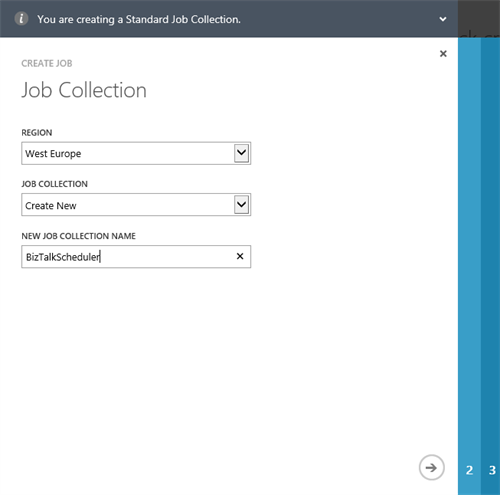
In the next screen you can specify the specific Job Action. After you specified an appropriate name for your Job Action you can choose an Action Type.
In our case we selected the HTTP action, but other options are: HTTPS and Storage Queues. Specify POST as your Method and fill in the BizTalk HTTP endpoint.
Next to that you can also specify the body content, in our case we added the <AzureMasterDataTrigger /> tag. This is to identify the trigger inside BizTalk.
Click on the arrow to continue creating the scheduling job.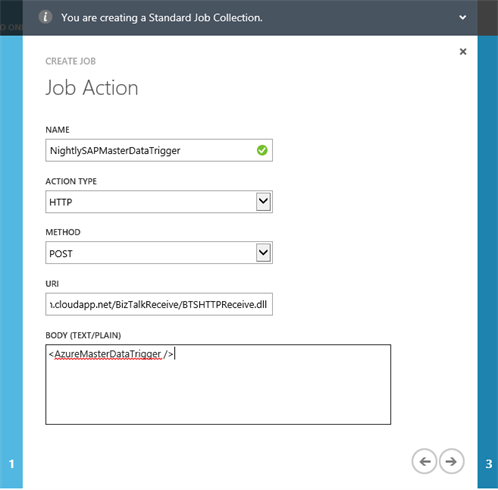
The final screen will allow you to create a schedule on which your job will run. In our case we will implement a recurring job that will run every week on every week day.
Next to that you can choose a starting time and the data/time until when to run this job.
Click on finish you complete this job creation.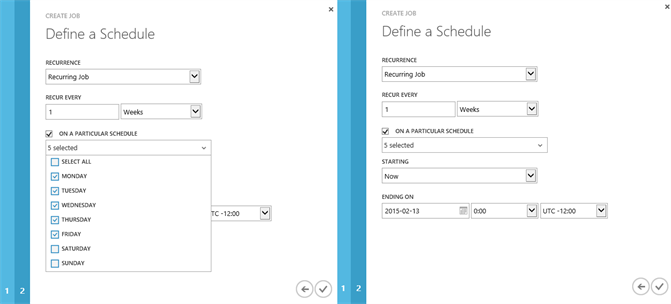
Based on your configuration and setup the job will start running or will start running in the future. Inside the Azure Portal you can see a history of when the Job ran and what status it has.
You can see an example of the tracking history below. More details are available inside the Azure Portal once you’ve created the job.

Conclusion
As there is no out of the box solution for triggering in BizTalk we sometimes need to be creative as developers.
Using the Azure Scheduler can be an option to bring triggering options to BizTalk. It’s fairly simple and creating and configuring a Scheduling Job literally takes a couple of minutes.
In this blogpost I showed you how to create a Scheduling Job and in what kind of scenario’s you can use the Azure Scheduler in combination with BizTalk.
Happy Triggering!
Cheers,
Glenn Colpaert
Subscribe to our RSS feed