JavaScript testing using Grunt, Karma, Istanbul and PhantomJS
You should be able to follow along if you have an existing Javascript application or you could use the sample application (ASP.Net Web Api project) attached at the end of this blog post series. The sample application consists of a simple AngularJS application that also has a configured javascript unit test, it also includes all configuration files needed to run tests / tasks.
Setting up our environment
Installation of nodejs
The installation of nodejs is pretty straightforward. Open the Node.js command prompt once the installation is completed.
Using NPM
We will use NPM (Node Packet Manager) to install all required JavaScript packages. Any packages installed with NPM should not directly be apart of our Visual Studio Project. Instead we will install them in the solution folder, not in a project folder. You can compare it with NuGet that also has a “packages” folder on solution directory level but NPM will create a “node_modules” folder.
When installing packages with NPM, you can install them globally (-g) or locally (–save-dev). When they are installed locally, they are stored with your solution (other developers (and build server) will have them out of the box).
Creating a “package.json” file (NPM Configuration file)
The packackage.json contains all the meta-data of the installed packages. “devDependencies” lists all the local installed modules. You could generate a package.json file using the npm (wizard) command: “npm init”
Or you could start with a basic file like this (it includes all packages we’ll use later on):
You could do a package restore locally by entering “npm install”. It will check what packages are already installed and install the missing devDependencies. If you want to install them manually, you could clean the devDependencies and install them by entering: “npm install [PackageName] –save-dev” for each package.
Creating Unit Tests
JamineJS
Our Unit test library that we will use is JasminJS v2.1. In the demo application, I’ve added a very simple unit test that you can use. You can download the javascript project or ASP.Net project at the end of this post.
Karma
Karma is a test runner developed by the AngularJS team. The framework is able to execute unit tests in the scope of a browser. To use karma in the command line, install the CLI: “npm install -g karma-cli”.
Karma makes use of a config where you could specify a bunch of options. Right now it is important to configure Karma to use Jasmine as our test framework, karma-coverage as our code coverage runner and to instruct what our test files are.
Creating a config file can be done by following command: “karma init karma.conf.js” but the following config should get your running:
We name this config karma.chrome.conf.js and place it next to the other configuration files in the solution root directory.
Running Unit Tests using Chrome
Once our configuration is done, we should make sure our test runs without problems. To run your JavaScript tests, browse to the solution root and executing the following command: “karma start karma.chrome.conf.js”.
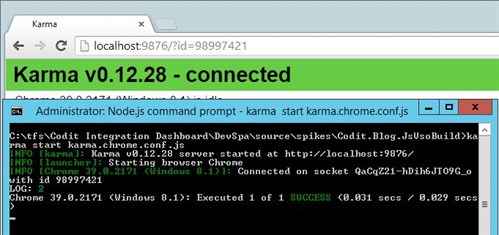
You should notice that an instance of Chrome is starting up to execute the unit tests in the browser context. Because of the autoWatch and singleRun properties in the configuration, you could just keep writing code and your tests will be executed each time you save a file.
Running Unit Tests using PhantomJS
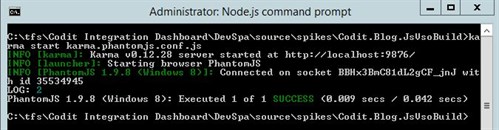
Because we are preparing to run our test on a build server, we will also create a config file to execute our tests in a PhantomJS context. PhantomJS is a headless WebKit scriptable with a JavaScript API. More like a browser without a GUI.
Create the following karma config file (“karma.phantomjs.conf.js”). Please note that we will do a singleRun and will not watch for any file changes (autoWatch). Of course we need to change the browser to PhantomJS too…
Html Reporting and Code Coverage
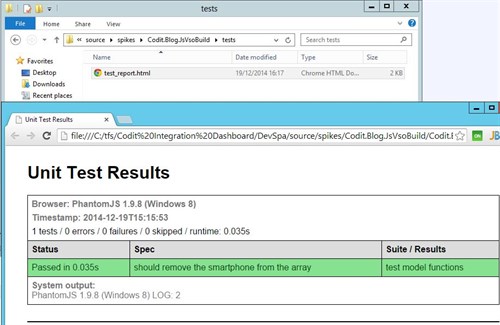
There are plugins that could give you some insight on your JavaScript unit tests. The first plugin that we will use for Karma is “karma-htmlfile-reporter“. When we run our test on the build server, we can read this report afterwards so we are certain that our tests were all succeeded.
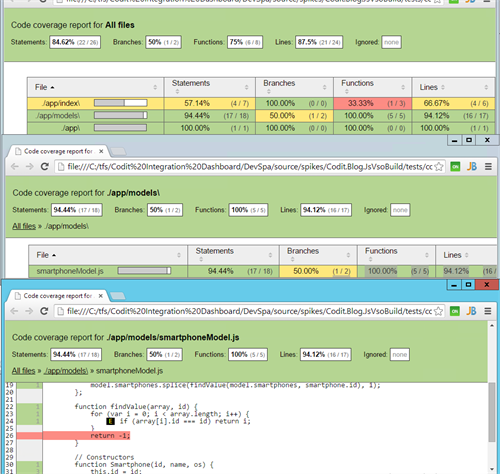
The following plugin is “karma-coverage“. This plugin wraps “Istanbul” to use with karma. It will generate a detailed report of the code that has been tested.
In order to run those 2 tools, we make some modifications to the “karma.phantomjs.conf.js”
We will use this configuration file later in Grunt.
About Grunt
Grunt is a task runner, using configuration, you can group multiple task and let Grunt handle the execution of these tasks. It is extremely useful because you can define different tasks that combine a number of actions. On the build server we can always minify, uglify and run unit tests. On development we might only want to run unit tests and check syntax using js-hint. Most popular packages support the grunt task runner, for a complete list check: http://gruntjs.com/plugins.
Installing Grunt-CLI using NPM
In a node.js command prompt enter following command “npm install -g grunt-cli”. This will globally install the CLI so we can use grunt from everywhere.
Creating a “Gruntfile.js” (Grunt Configuration file)
When grunt is running, it will lookup the configuration from the Gruntfile.js. This file should be placed next to package.json in the solution root.
Let’s run the same unit tests using grunt. Execute the command: “grunt test”.
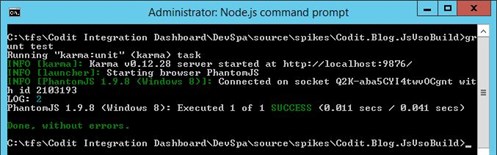
Basically it’s doing the same thing as before but now we can add multiple tasks to our grunt task, will be useful in our build process scenario. For example if we run another task “grunt release” it will run our unit tests but will also validate our application code for possible syntax errors.
How we can execute these commands on the build server is described in part 2 of this blog series.
Sample Solution Files:
Note: execute the “npm init” command to restore the node_modules folder. The packages are not included.
Download [22.5 MB]
Subscribe to our RSS feed