Early March, I gave a demo on the BizTalk Summit in London. The video can be downloaded through the following blog post of Glenn Colpaert: Taking a look back at the BizTalk Summit London – Day 2. After my talk, some attendees asked for the code or wanted a bit deeper explanation. That’s why I decided to blog about this.
The coolness in the demo is mostly because of the use of Twilio, a cloud based voice and messaging platform that can easily be used to build applications, using their easy to use and understand web API.
In this blog post, I will describe the scenario, the architecture and explain some parts of the code that were specific to this demo.
The source code of the demo has been uploaded to the following location: http://code.msdn.microsoft.com/State-machine-workflow-68a078f3
The scenario
In the scenario, I wanted to build and orchestrate a phone handling system that is built for an airline company. A customer can call to a phone number, provided by that airline company (and hosted by Twilio). Then, he gets a typical phone menu (press 1 to check in, press 2 to upgrade your flight, press 3 to cancel your flight). Based on the input of the user, he gets some new options, until the actual action occurs.
The following picture shows the slide that give the phone menu hierarchy.
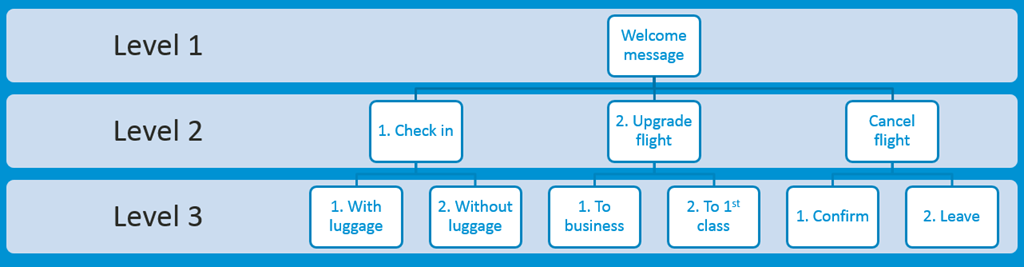
During the demo, the attendees could call the (toll-free) number and enter their options. One of the options in level 3 resulted in a win. The first user that ended up there, won a prize.
The architecture
The following slide shows the architectural overview of the solution I demonstrated:
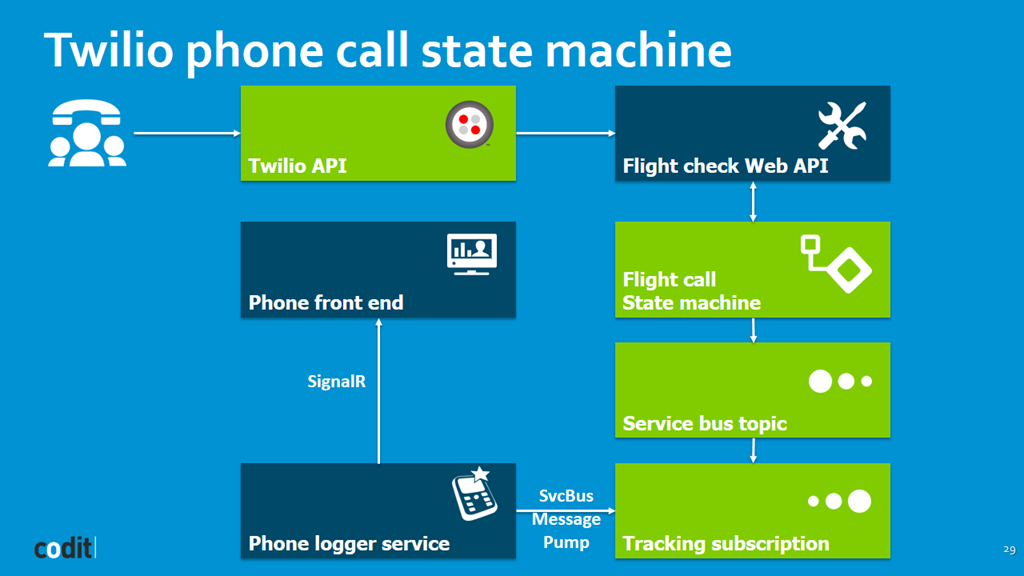
Twilio: the online service for phone and text messaging.
I used Twilio to make the link between the phone and my hosted service. On Twilio, you can register a phone number. For this, you pay an amount per month. Every phone number is then linked to a RESTful URI. Whenever someone calls that phone number, Twilio will call the specified URI and pass the CallerId with some other arguments. It’s then up to the specified REST API to return a TWIML document, an actual XML document that can specify that Twilio should Say something, Play a sound, Gather information from the user, Dial another phone number to join the call, Record the user’s voice, etc.
Flight Check Web API
The Web API was where most of the custom code for this demo went. In this API, I implemented one specific operation that gets called every time. I then used it to either start a new workflow instance (when it is a new phone number), or to send new events to an existing workflow (when the user has an active call and sent digits). When the events are passed to the workflow, the API collects data from that workflow instance and returns a TWIML document, based on that data).
The Flight call state machine workflow
This is where the logic of the phone call is modeled: A state machine is a very interesting concept where a workflow is in a certain state and listens for external input (published events, etc). When a specific event is received, it can trigger a transition to a new (or the same) state. Every transition can have some actions. This is a much more natural model, compared to FlowCharts or Sequential Workflows, especially when it comes to event-driven workflows. In my state machine, I had some custom activities that either set the Next User Options, the Goodbye message or listened for specific Digits from a user.
The notification components.
I also used the Service Bus workflow topic to subscribe on all the tracking events. Whenever a tracking event is received from the subscription, the event gets parsed (the phone number is extracted, the options, good bye message and the workflow state). Then these events are sent to an HTML based front end, using SignalR. This way, all calls could be monitored online. This pattern will not be discussed in detail in this post.
Configuring Twilio
When you have an account on Twilio, you can log in and buy one or more phone numbers. For the number I had bought, I configured the following URI (with the GET verb) to be called (removed host name from screenshot):

So, as soon as someone would call my Twilio number, Twilio would come and ask my API what to do. That’s all I had to do on the Twilio site. This is what I like about “things as a service” in our current time. If I had want to do this myself, 10 years ago, it would have taken me a lot of money, external experts and testing. Now I just take this service in a matter of minutes and I can focus on what I do best…
The State Machine workflow
I love state machines. I am convinced they provide a much more natural way of representing a workflow, compared to a sequential workflow or a flow chart. I also used the State Machine concept for the definition of my Twilio phone menu.
A state machine has different concepts:
- State: a workflow instance is always in a certain state. Every state has to have one or more transitions to another state (except for the final state). A state can have an entry point and an exit point, where specific activities can be configured and defined.
- Transition: a transition is the change from one state to another (or to the same state). A transition happens, when the configured trigger for that transition is fired, or when the condition for the transition is met.
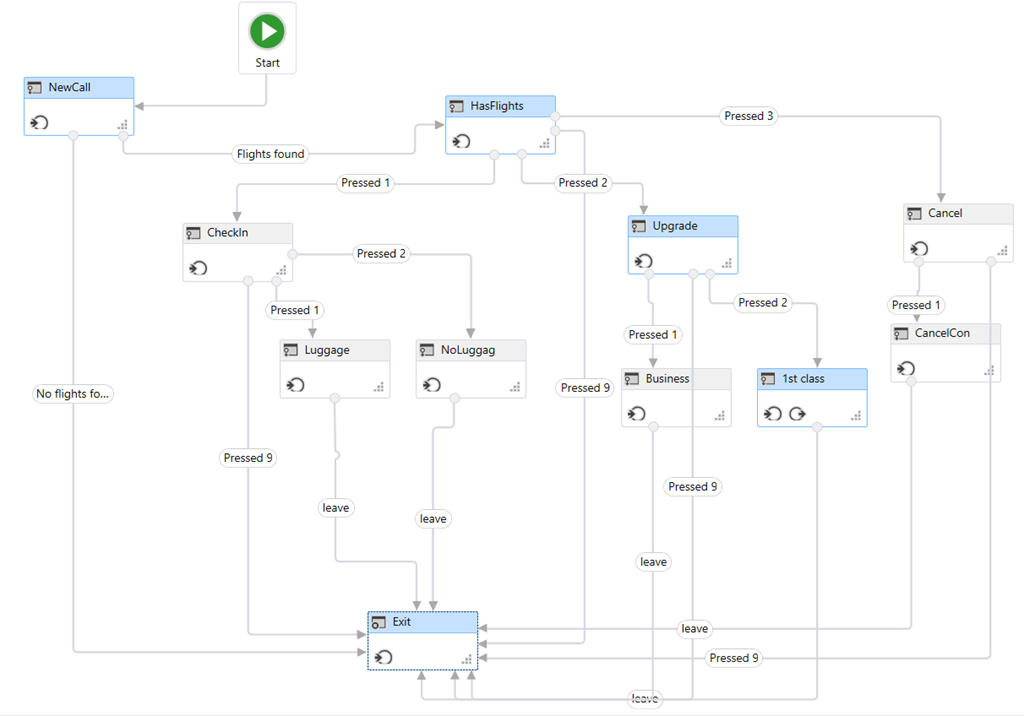
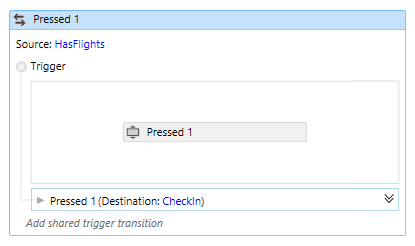
For the phone menu, I used the following workflow (FlightMenuStateMachine.xaml). In the image below, I selected the different states that would be followed, when a user would press 2 (to upgrade) and 2 (to upgrade to 1st class). Between all these states, I have transitions, triggered by the input of the caller.
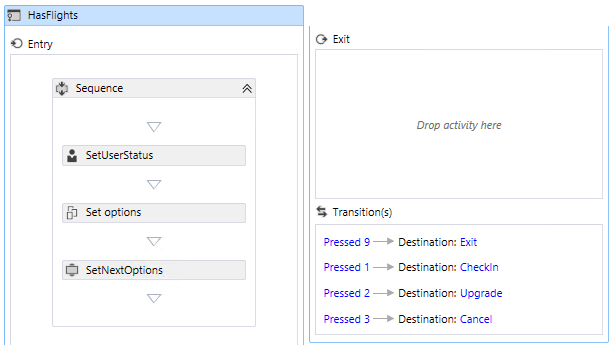
In the 2 screenshots below, you can see what a State and a Transition look like:
- The state shows that I set the next user options on the entry of the state, using the custom activities, I created. The exit step is empty.
- You can also see the different transitions and the state they will move the workflow to.
- In the second screenshot, you can see that I use the ReceiveCallerInput activity to listen for a specific entry to happen.
Listening to external triggers, with the Pub/Sub workflow manager activities
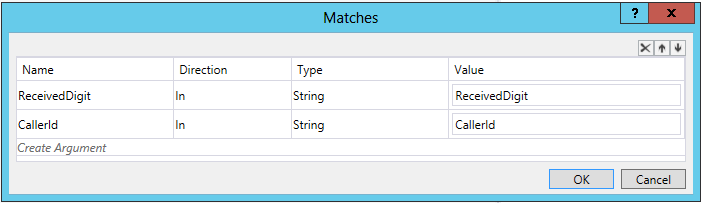
When the Caller enters a specific digit, this digits has to be pointed to the right workflow instance as an input event. For this concept, I use the ReceiveNotification activity that is provided with the Workflow Manager activities (in the ReceiveCallerInput.xaml activity).
I am using the following Pub/Sub activities in my custom workflow activity:
- BuildMatchAllFilter activity: in this activity, I define the actual filter I will be using. This filter will result in a new subscription on the Workflow topic. For the filter, I use the CallerId and the Digit I want to listen for. This means that this filter will be triggered, when my API sends a notification for this specific Caller with the specific Digit.
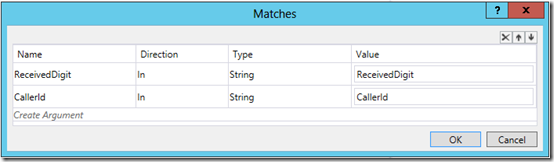
- Subscribe activity: this activity takes the filter created in the previous activity and uses it to create a Subscription on the WFTopic, used by our specific Workflow scope.
- ReceiveNotification activity: this activity blocks this branch of the workflow until a notification is received through the Subscription that was just created. So if we actually receive a notification that matches our filter, the transition where our activity is used, will be fired and executed.
- Unsubscribe activity: this activity will explicitly remove the subscription from the topic.
Providing external data to the Web API, using external variables
Through the workflow client, it is possible to pass external variables to a workflow instance. These external variables can then be updated by the workflow, so that the workflow client can inspect these values. There is one ‘hardcoded’, system-provided external variable and that is the UserStatus variable. This variable can be set, using the SetUserStatus activity that comes with Workflow Manager. It is a nice and easy way to expose state from the workflow.
These variables can only be set by editing the XAML directly as they are not visualized to the Workflow designer. This can be done with the following code:
<Assign sap2010:Annotation.AnnotationText=”External variable GoodbyeStatement is set here” DisplayName=”Set GoodbyeStatement to external variable”>
<Assign.To>
<OutArgument x:TypeArguments=”x:String”>
<p:ExternalVariableReference x:TypeArguments=”x:String” Name=”GoodbyeStatement” />
</OutArgument>
</Assign.To>
<Assign.Value>
<InArgument x:TypeArguments=”x:String”>
<mca:CSharpValue x:TypeArguments=”x:String”>GoodbyeStatement</mca:CSharpValue>
</InArgument>
</Assign.Value>
<sap2010:WorkflowViewState.IdRef>Assign_1</sap2010:WorkflowViewState.IdRef>
</Assign>
There were 3 variables I used to provide state and data from my workflow instance to my Web API:
- UserOptions: this variable could be set through the SetNextOptions.xaml activity. It would contain a CRLF separated string with the different options for the current state of the phone call.
- GoodbyeMessage: this variable could be set through the SayGoodbye.xaml activity. This activity would typically be called in the last state, when the user call had to be terminated.
- UserStatus: as described, this is the standard variable that I used mostly for debugging and visibility through the Workflow Explorer.
Custom activity to insert data in a database, using the Http activities
In the presentation I gave, there was one spot in the phone menu where I entered the Caller Id from the users into a database. The first entry in my database table was the winner. For this, I used an Http post activity that just posted the CallerId to my Web API, so that the CallerId could be inserted in the database.
The Web API as glue between the Twilio input and the Workflow instances
Now the actual magic happens in the Web API, I wrote. There I get the input from Twilio in my controller and I interpret the different worklow instances and their state. Based on the state of the instances, I return the specific TWIML document.
Custom serialization for TWIML.
The response I have to return to Twilio is TWIML. This is an XML structure. But the TWIML cannot be generated, using the standard DataContractSerializer. Therefore, I had to add the XML serializer in the global.asax.cs file, using the following line:
var twilioFormatter = new TwilioMLXmlMediaTypeFormatter();
twilioFormatter.MediaTypeMappings.Add(new QueryStringMapping(“format”, “twiml”, “application/xml”));
GlobalConfiguration.Configuration.Formatters.Add(twilioFormatter);
By adding this line, I allow my API clients to demand the response to be in TWIML, when they add a query string variable format=twiml. As you can see in the screenshot of my Twilio configuration, you can see I have added that parameter in the API. The actual TypeFormatter class is copied below. As you can see, I just use the standard XmlSerializer there to serialize my objects to the corresponding XML structure, based on the attributes I have added to the different classes. (You can see this in the code in the ModelsTwillioResponse.cs of the Web API.)
public class TwilioMLXmlMediaTypeFormatter : XmlMediaTypeFormatter
{
public override Task WriteToStreamAsync(Type type, object value, Stream writeStream, HttpContent content, TransportContext transportContext)
{
try
{
var task = Task.Factory.StartNew(() =>
{
var xns = new XmlSerializerNamespaces();
var serializer = new XmlSerializer(type);
xns.Add(string.Empty, string.Empty);
serializer.Serialize(writeStream, value, xns);
});
return task;
}
catch (Exception)
{
return base.WriteToStreamAsync(type, value, writeStream, content, transportContext);
}
}
}
State machine interpretion
The main logic of the API was to either create a new workflow instance (when there was no active instance linked with the caller) or to send notifications (the entered Digits) to the active workflow instance. This all happens through the WorkflowManagementClient class.
Starting a new workflow.
To start a new workflow, we just create a new Workflow instance and pass the CallerID as an input argument to the Workflow. The instance ID is then kept in a Dictionary to keep books of our active workflows (and to avoid asking Workflow Manager on every call).
WorkflowStartParameters startParameters = new WorkflowStartParameters
{
};
startParameters.Content.Add(“CallerID”, CallerId);
var instanceId = WFClient.Workflows.Start(_workflowName, startParameters);
_workflows.Add(CallerId, instanceId);
Sending digits as notification to an active workflow instance
When digits are received and we see there is an active workflow instance for the Caller, we send a notification with the CallerId and the entered Digits to the instance. Behind the scenes, this is sending a message to the Service Bus topic that our Workflow scope is using. These notifications will then be picked up by our above described Pub/Sub activities.
WFClient.PublishNotification(new WorkflowNotification()
{
Properties =
{
{ “CallerId”, CallerId },
{ “ReceivedDigit”, Digit }
},
Content = new Dictionary<string, object>()
{
}
});
Get next steps from the workflow instance
In this code extract, we check the workflow instance, verify if the instance is started and then check for the UserOptions variable, that we use to return the TwilioResponse object from our API.
// Here we read the external variable ‘UserOptions’ from the workflow instance
// This is a string with multiple lines that we will use to return the different options
string optionsVariable = “{http://schemas.microsoft.com/workflow/2012/xaml/activities/externalvariable}UserOptions”;
string goodbyeVariable = “{http://schemas.microsoft.com/workflow/2012/xaml/activities/externalvariable}GoodbyeStatement”;
if (_workflows.ContainsKey(callerId))
{
string existingWorkflowId = _workflows[callerId];
var wfInstance = WFClient.Instances.Get(_workflowName, existingWorkflowId);
if (wfInstance != null)
{
if (wfInstance.WorkflowStatus == Microsoft.Activities.WorkflowInstanceStatus.Started)
{
if (wfInstance.MappedVariables.ContainsKey(optionsVariable))
{
var options = wfInstance.MappedVariables[optionsVariable];
return parseOptions(options);
}
}
}
}
The actual API controller action
In this code extract, you can see that I either create a new instance, or use the active workflow instance, using my StateMachineInterpreter class (of which I have included some extracts above).
As you can see, Twilio will send me the Caller and Digits querystring variables, when they are available. These are the only input parameters I need, as I correlate my workflow instances on the CallerId and use the Digits to trigger the right transitions.
There is one thing I don’t like that much in this design. I am sending the notification over the service bus topic and this usually result very fast in the state transition. But in a few cases, it happened that I listened for the external variables that were not yet set (because the notification was still handled). This resulted in the same menu choice sent back to my caller. Therefore, I do a short sleep between the notification and the inspection of the external variables. Sync over async is not always ideal…
// GET api/flight
public TwilioResponse Get([FromUri]string Caller = null, [FromUri]string Digits = null)
{
// If caller is unknown > reject
if (Caller == null)
{
return new TwilioResponse { Reject = new TwilioReject { Reason = “rejected” } };
}
// Check if there is an active call process for this phone number
if (!StateMachineInterpreter.HasActiveWorkflow(Caller))
{
DebugWriter.Write(Caller, “Starting new workflow”);
StateMachineInterpreter.StartNewWorkflow(Caller);
}
else
{
DebugWriter.Write(Caller, “Sending input to existing workflow”);
StateMachineInterpreter.SendInputToExistingWorkflow(Caller, Digits);
}
// I don’t like doing this, but I will anyway – taking the time to have the published event being handled
Thread.Sleep(450);
// At this step, we have an active workflow, linked with the Caller.
// Now get the next input
string goodbyeStatement = null;
var nextOptions = StateMachineInterpreter.GetNextSteps(Caller, Digits, out goodbyeStatement);
return getTwilioResponse(Caller, nextOptions, Digits == null, goodbyeStatement);
}
Conclusion
With this demo, it was very visible how Workflow Manager could receive external input and give back feedback. It also showed how multiple workflow instances could be running in parallel and how events can be correlated to the right workflow. Together with the magic of Twilio, this resulted in a nice demo that allowed different people from the audience to participate interactively.
Sam Vanhoutte
Subscribe to our RSS feed