Continuous Integration with JavaScript
This post is part 2 of 3, it is recommended that you read part 1 first.
If you don’t have a Team Foundation Server you can always create one for free (up to 5 users) on the Visual Studio Online website.
The build controller that is used by default on TFS Online has a bunch of software installed. Luckily for us they also installed node.js which makes it fairly easy to execute our Grunt statement (see part 1). Make sure you have checked into TFS all the files (config files, node_modules) and that there were no files excluded from check-in.
Execute batch file in Pre-Built event
The Pre-Built event is self-explanatory, we’ll add the following:
We will only execute this command if we’re in the Release configuration. The first argument is the task name that needs to be executed on the grunt task runner. The second argument is needed to get hold of our solution directory.
Note: we use the $(ProjectDir) macro because we are building the project files and not the solution. The reason we are building project files is to make advantage of the “Package” functionality on MSBuild (see below).
To execute grunt on the build server, we will create a gruntCI.bat file in our solution directory. We will execute this file on Pre-Build of our main project. The batch file should perform the following actions:
- Remove the read-only flag on the workspace files retrieved by the build server
- Install grunt cli on the build server
- Execute grunt “release” task
You could ask yourself why we aren’t just installing the grunt-cli and execute the grunt task by using the “grunt [task]” command. This used to work on the build server, however Microsoft changed its security policy on the build server and you cannot add variables to the PATH variable anymore. Therefore, we need to look for the grunt.cmd file and run grunt from there. We also need to use the “call” statement in order to continue executing the batch file after grunt is completed.
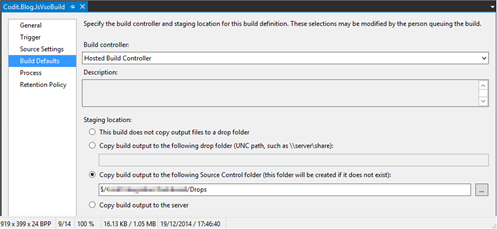
Create the build definition
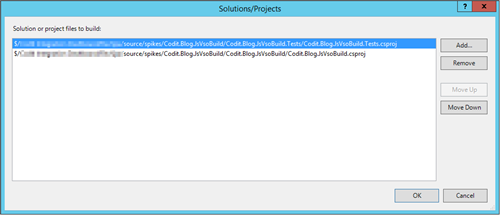
The build definition is pretty standard, we will build our ASP.Net application project and the associated test project.
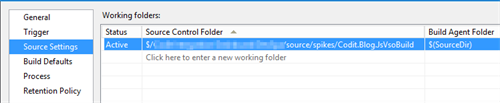
Configure the source settings to point to the solution folder. If you don’t use this source path, you will have to keep this in mind when configuring the PowerShell script (see later).
Select both projects and make sure they build in release mode for “AnyCpu” (notice there is no space between “Any” and “Cpu”. Tfs adds a space automatically but you’ll need to remove it afterwards).
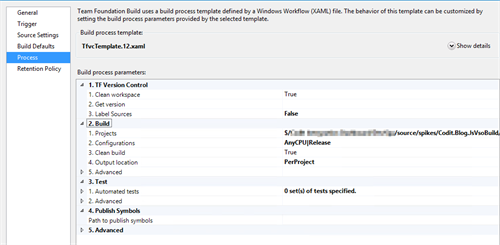
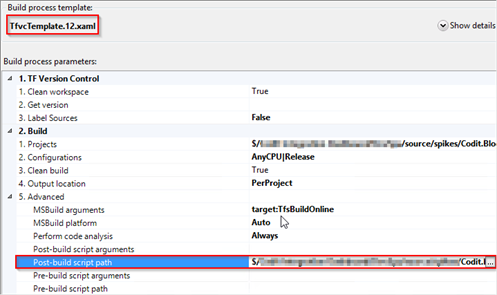
If possible, you should use the TfvcTemplate.12.xaml as Build process template. It enables us to execute a PowerShell scripts after MSBuild completes (see later).
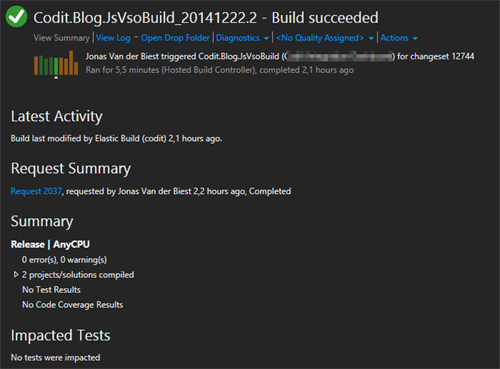
Running the build
Run the build, pray it succeeds and then have a look at the MSBuild log
If you navigate to View Log and MsBuild Log File, the output of the batch file should be logged as such:
Publishing build artifacts
Now that our build is running, how can we easily check if our tests were running fine. Where can we have a look at the code coverage report? It requires a bit more configuration to get us a clean package.
Configuring the drop location
When we configure a drop location, TFS Build will copy the output of the build to this directory.
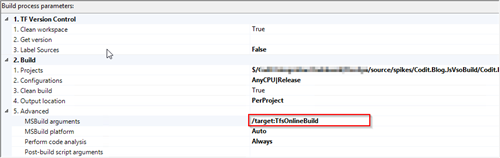
Configure the MSBuild Package target for multiple projects
With the “Package” build target, we can let TFS Build create a Web Deployment Package. You will end up with a zip file that contains your website and that can easily be imported into IIS. We will now take advantage of this built-in functionality.
Not all Visual Studio project types have this “Package” target. ASP.Net supports this, you just need to trigger it using MSBuild. But with this target comes another pitfall, the test project doesn’t support this target. With MSBuild you cannot specify a build target that is specific for a project file, your project files will all try to use that target when building. Conclusion, if you specify the “Package” target as a MSBuild argument, the build will currently fail. To make it work, you should create a new MSBuild target in both project files and execute the desired child targets. If we then add this new target to the MSBuild argument, everything will run smooth. The following code will make it clear.
In our asp.net project we add the following target:
In our asp.net test project we add the following target:
Now we can specify an MSBuild argument named TfsOnlineBuild. Also set the Output location to “PerProject”, it will make it easier in Powershell to copy our project to a clean folder.
Adding a PowerShell script to organize our drop location
Creating the powershell
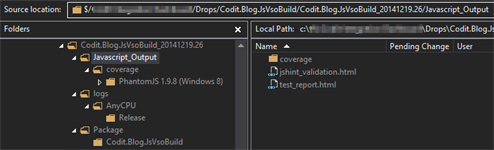
When you’ve followed all the previous steps, the current drop location should look like:
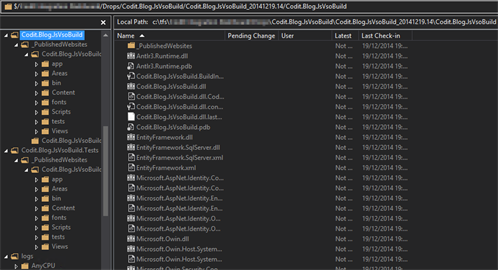
We are only interested in the logs and the Web Deployment Zip Package. There is a bunch of other stuff (like *.dll’s in the _PublishedWebsites folder), the test project, …) as you can see in the screenshot.
As we are writing a PowerShell we can also organize things a bit better. The PowerShell script will do the following.
- Look for any packaged zip file and copy the folder to the root folder.
- It will copy the test output folder from javascript to a new root folder: “JavaScript_Output”
- It will remove all “trash” but keep the important root folders like “logs”, “Package” and “JavaScript_Output”
We add a new file to our solution folder (“OrganizeDropFolder.ps1”), add the content and check it in on TFS. If you didn’t follow the instructions about the “Source Settings”, now is the time to change the path in the script. You should change line 18 to match your relative path.
Then we reference the script in our build definition, so it runs after MSBuild is complete.
When we now build again, we see the following PowerShell log in the build logs:
And we get the desired result in our TFS drop folder:
In this part we have discussed how to configure TFSBuild to execute your javascript tasks and organize the drop folder. If you have questions, feel free to use the comments below.
See part 3 for the conclusion of this series.
Sample Solution Files:
Note: execute the “npm init” command to restore the node_modules folder. The packages are not included.
Download [22.5 MB]
Subscribe to our RSS feed