These days more and more interfaces are moving to the cloud to enable integrations between all kinds of systems, but in some cases we still require access to on-premises resources, such as file-shares, SQL Servers, Oracle databases, SAP or BizTalk Server to achieve a full hybrid scenario.
In this post, I will not go into details about how to install the on-premises data gateway, but instead I’ll list up some of the settings to take into account and a couple of errors you might run into.
Keep in mind that at the time of writing, the on-premises data gateway has a size-limitation of:
- 2MB for write-operations.
- 2MB for read-operation requests and an 8MB compressed data response limit.
Before using this service, carefully evaluate whether this is the right option for your use-case.
Official documentation
Below are some useful links towards official Microsoft documentation regarding the On-Premises Data Gateway in combination with Logic Apps:
Things to keep in mind during installation
- Use a local administrator account to run the installation of the on-premises data gateway.
- Install the OPDG on a machine located within the same network as the resources you need to access, but ensure it is not a domain controller.
Keep in mind that the closer the service is located to the local resource, the lower the latency. - By default, the installed service will be run-as a newly created account “NT SERVICE\PBIEgwService”.
Do not change this, as you might run into (connectivity-)issues when attempting to register the instance in Azure.
The only reason you might actually need to change this to a domain-account would be to resolve authentication issues when using a proxy. - Make sure to use a work or school account that is managed from Azure Active Directory to sign in during the installation-process.
A personal Microsoft-account will only grant you access to consumer-based services, such as Outlook, OneDrive, Xbox Live,… as you can read over here. - Think about the region you select during the installation process, as you’ll have to select the same region when registering the instance in Azure.
- The name assigned to your OPDG-service should be unique across your AD tenant.
- Log into the Azure portal using the same AAD-account in order to register the OPDG-instance in an Azure subscription.
You will not be able to register – or even see – the instance when using a different account. - As of the release of June 2019, the service is set to use the HTTPS-protocol by default in order to communicate with Azure Service Bus.
Want to make sure the TCP-protocol is used instead? Have a look at the following documentation - While the OPDG doesn’t require you to open up any inbound ports in your firewall, it does require the following outbound ports to be opened up: (TCP) 443, 5671, 5672 and from 9350 through 9354.
To get an overview of the ports and more information, check the following documentation.
Where to find the logs
Whether you are experiencing issues during installation or when attempting to access local resources, the first location to start looking for clues would be the logs.
Here is where you can find these logs:
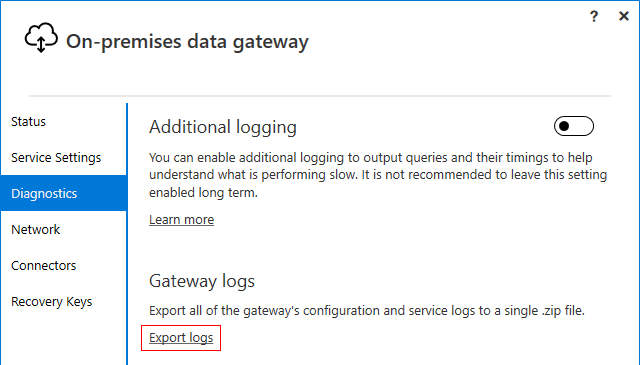
- In the on-premises data gateway app, select Diagnostics and then select the Export logs link.
The log-files will be saved to the ODGLogs-folder that will be created on your server – in my case this was created on the desktop – in .zip format, which will also include a txt-file named GatewayProperties.txt, containing useful information about your gateway registration.
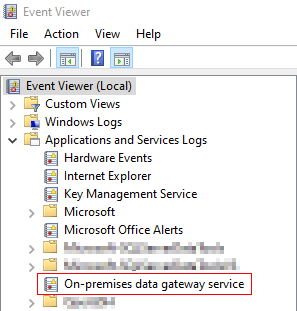
- Check the Event Viewer on the server that has the OPDG-service installed, navigate to Applications and Services Logs and select On-premises data gateway service.
- When going through the logs you might run into Service Bus-related exceptions.
Find some more details and guidance about these exceptions on this page.
How to use an ODPG-instance across multiple subscriptions
Officially since last summer – and fully functional since a couple of months – the on-premises data gateway can be shared across multiple subscriptions.
While at first glance this seems to be something trivial, it is in fact a very useful enhancement.
Before this feature was made available whenever you wanted to separate your resources into different subscriptions based on the environment and if these resources required access to on-premises resources, you were required to install 1 on-premises data gateway per environment, as you can only register each on-prem gateway once in Azure.
This also meant that, since you can only install a single gateway per machine, you were required to have at least 1 server, whether this was physical or virtual didn’t matter, per environment, even if all of those were pointing towards the same resource, e.g. a file-share.
With this feature this is no longer required. Simply install an on-premises data gateway onto a server within your network, register it within 1 of your Azure subscriptions and you will be able to connect from all your subscriptions within the same tenant.
Or, at least, you should be able to connect.
If you want to create a new ApiConnection from the designer view, you will be able to select your registered gateway from any of the subscriptions available to you, within the same tenant.
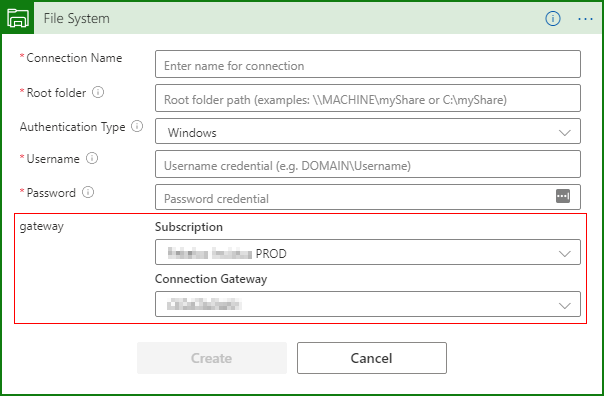
However, if you’ve registered the on-premises data gateway within a subscription that hasn’t been used for anything else yet, you might run into the following error-message when attempting to create an ApiConnection: ‘/subscriptions/{SubscriptionId}/resourceGroups/{ResourceGroup}/providers/Microsoft.Web/connections/filesystem’. Encountered internal server error. The tracking Id is ’67bec0fd-a8d5-49a2-9d84-48481c3c68bf’.
The infamous internal server error, without any other trace or indication as to what might be causing it.
This could, of course, have several causes, of which the last one – it’s always the last thing you check – solved it for me:
- Your on-premises data gateway instance is unable to connect to the internet.Even though the install-prerequisites documentation doesn’t immediately mention this, as stated earlier, some outbound ports need to be whitelisted, either directly within your server’s firewall or further up the chain with your ISP.The outbound TCP-ports used by the gateway are 443, 5671, 5672 and from 9350 through 9354.
As mentioned above, an overview can be found in the Microsoft documentation.Next to the network port tests included in the on-premises data gateway UI, you can also execute below command to verify whether a connection can be made to Service Bus across the given port: Test-NetConnection -ComputerName {namespace}.servicebus.windows.net -Port 9350More information about this command can be found here.- The Azure subscription, into which the on-prem gateway has been registered, is so brand new that the resource provider ‘Microsoft.Logic’ hasn’t been registered yet.Seems odd that this is required? Well, not really!
When creating a new ApiConnection, what happens in the back is that the runtime is going to look for the connector-specific managed API within the subscription where the gateway has been registered – ok, this might be a bit odd – in order to link the new ApiConnection to the selected on-premises data gateway.
If, at that time, the Microsoft.Logic resource provider hasn’t been registered yet, you won’t be able to use any of the Logic Apps-related services, which includes the connectors and their API’s.
Conclusion
When making use of the on-premises data gateway you could stumble upon several types of issues which could all be related to misconfigurations and while this is a service which has been around for quite some time now, it’s sometimes hard to find the right answer to your problem.
Be aware, while this service can be useful in many situations, it could turn out to be another time-consuming factor during the setup of your infrastructure which could result into some extra latency or become a blocking factor when looking at the size-limitations.
As always, carefully investigate the capabilities and limitations before including any additional services into your architecture.
Subscribe to our RSS feed