Why property-based testing is the right choice
The Python implementations in the Arcus ML repository are very generic and are meant to be used in a wide range of different scenarios. This means we need to test them thoroughly. Adding some static example-based tests that verify if some static input results in an expected static outcome is not enough. At Arcus, we try to make sure that every developer of any level – both senior and junior – can access the codebase. It would therefore be unwise to remove all of the example-based tests from the project.
Tests should be the first place users look for the purpose and workings of the implementation. This should therefore be an even more comfortable place than the actual production code.
Hypothesis is the testing framework we use here. Like most property-based testing frameworks, it has composite generators and combinators. This is especially useful in our scenario, where we need to generate a broad range of inputs. Machine Learning is also about decisions that are made on a gigantic pile of data. Just like in the actual building of the model, where you don’t know a single dataset by heart, the tests make sure that we cover all of our bases, so it can be used in performance-intensive scenarios.
Image conversions for easier pattern detection
The Arcus ML repository contains a set of functions to manipulate images. Transforming images is especially useful when preparing a raw set of images as a clear ML dataset. One of the functions is used to transform an image into a black/white variant. Without the distraction of color, it can be more easily used in a pattern detection system. This function takes in a series of images as numpy arrays and returns them back transformed.
The example-based test uses a static list of images of lungs and converts them into a black/white variant of the lungs. See the following example of the result:
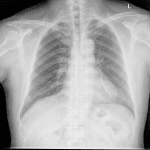

The test itself is rather straightforward: load the images, transform them, verify the outcome. The images are represented here as a 3D array (matrix of pixels) which ranges from 0 to 255, to show all of the available RGB colors. Our function should transform this 3D-array to only zero (0) or one (1) values, representing either black or white. The all_black_and_white assertion function here will do that.
Before we can write our properties for our black/white function, we first need to generate our random images. Above, we saw that these images are nothing more than 3D numpy arrays. Fortunately, Hypothesis has a way of expressing custom generators:
Without going too deep into the actual implementation, this function will register a generator for us that can generate 3D numpy arrays, where each cell contains a float value between 0 to 255. This is exactly what our example images in the previous static example-based test represented. It’s also worth mentioning that this implementation is a temporary result of a continuing process to improve the tests.
That was the hardest part. Once you have your generator all set up, you can integrate it into your property test. Note that the default property is even shorter than the initial static example-based test. The same assertion can also be reused here, proving a correct implementation of our black/white function.
Customizable time windows for more accurate prediction
A big portion of the Arcus ML library is about manipulating time series: combining, slicing, time references. For this post, we’ll be looking at the windows function which will provide us with a ‘windowed’ version of an incoming time series. Looking at time series in windows helps greatly to get a more accurate prediction for a given point with the recent past. Put simply, windows are nothing more than a set of smaller versions of the initial data set, each starting from a different place and possibly overlapping with each other. Time series are expressed here as pandas data frames and will output the windows as numpy arrays.
The tests use a static example of sensor values. This is a simplified set of that same data set:
The result of a windowed version of this data set, could be the following. Here we use a window length of 3 rows.
The static example-based test loads this dataset and verifies that indeed the result is ‘windowed’. The assert_all_windows_equals will generate the expected windows directly as a list of numpy arrays, and will do an equals assertion check for every expected window. This will make sure that we are absolutely certain that all values of all windows are correct. In the example, we can also verify the shape of the input, but as you can see, there are some hardcoded values that we hope to eliminate with properties.
Generating a table of sensor data as data frames is not as hard as one might think. Hypothesis already provides a way to generate data frames for us. All we have to do is provide it with reasonable sizes and types. In our first version, we used a subset of our initial sensor data columns and allowed Hypothesis to generate any non-Nan float number for us.
Different from the image conversions, we need an extra variable within our data set: the window size. As with property-based testing, we can’t know the size or format of the input beforehand. Thus we should also generate this window size value. We chose to place this generation in the test itself, to increase understanding of the relationship between the generated input data frame and the window size that needs to be within the bounds of that data frame. Hypothesis allows us to pass in a general data generator, which we can use to generate types at test-time.
As with the image conversions, we use the same assertion here to verify that the same result is to be expected: a windowed version of our generated sensor input.
Conclusion
This post explored the possibilities of property-based testing within the realms of Machine Learning. As with property-based testing, this Machine Learning also acts on a higher level. It doesn’t deal with specific values or examples but expresses its functionality in a broader, more general way. This separate way of working allows us to deal with the functional implementation of our application. Machine Learning makes predictions on a broad set of data, and property-based testing will make sure that this data is handled correctly by our model.
The way I see it, this will lead to many promising things in the future.
Thanks for reading!
Stijn
Subscribe to our RSS feed