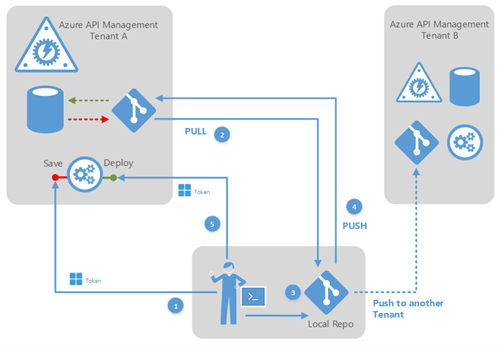
Scenario
All the configuration that are applied to the proxy and the portal customizations are stored in a database in the provisioned tenant. Now, every APIM tenants can expose a public Git endpoint to which we can refer to PULL the configuration down to our local (or remote) Git repository.
Once we have our local version, we can apply the changes we need, push it back to the tenant repository and then save it to the APIM database.
In the diagram below, the steps of our scenario
- Save (sync from the APIM repository to Tenant Git)
- Pull (From Tenant Git to local repo),
- Apply changes (on our local repo),
- Push (to Tenant Git)
- Deploy (from the Tenant Git to the APIM repository)
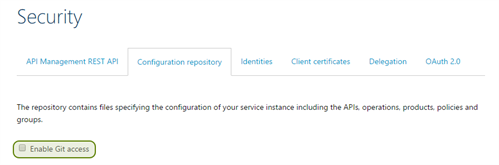
The Git integration is not enabled by default, so first we have to connect to the management portal, go to the Security area and enable the Git access.
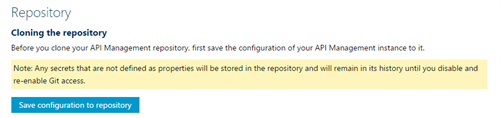
Save and Pull
Next step is to save the proxy configuration to the APIM tenant’s Git repository. This can operation can be done in two different ways:
- Use the “Save Configuration to Repository” button on the APIM Admin Portal.
- Call the “Save” operation of the API Management REST API (here how to enable the REST API).
In both cases you have to specify the branch name where to save the configuration and whether to override or not the changes in newer check-ins. This operation can takes a couple of minutes.
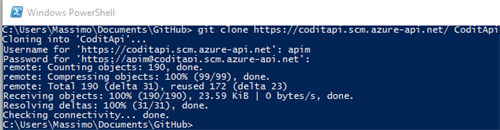
Once completed, you can open a Git console and pull the configuration to create a working copy of the remote repository by using the clone command.
Before that you need to get (in the Admin Portal) a temporary password to access to the remote repository.
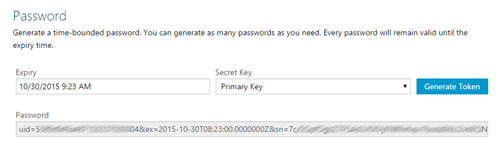
Then run the “git clone https://coditapi.scm.azure-api.net/” command and specify “apim” as username and the temporary password we got at the step before.
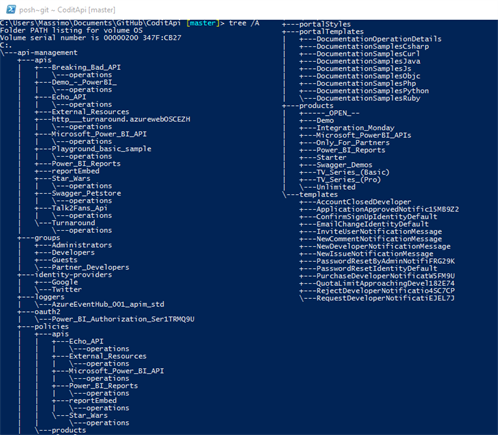
Below the folder structure of the local repository. As you can see the proxy configuration is exported (apis, policies, security groups and products) along with the developer portal customizations.
If in the meanwhile a new configuration has been saved in the APIM repo, we can pull it down with the “git pull” command.

Apply a change
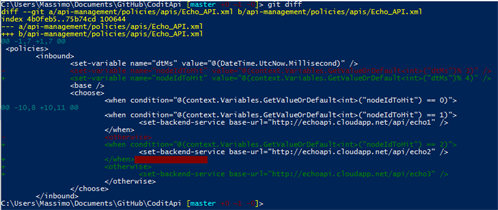
Let’s imagine we want to change the policy applied to the Echo API to extend the existing basic round robin algorithm.
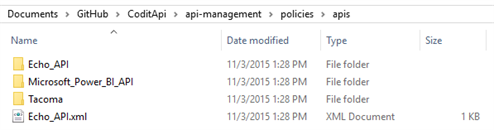
The policy is applied at API scope so the file to be edited is policies/apis/Echo_API.xml
This is the result of the “git diff” command after the change.
Now, in order to add the change to the git staging area use the “git add -A” command and then commit the changes with “git commit -m” as in the picture below.

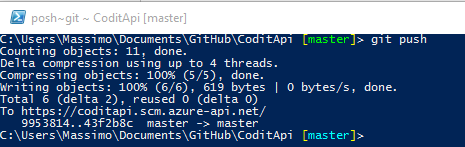
Now we’re ready to push our changes to the Azure API Management Git repo.
Push and deploy
Type “git push” to sync the changes with the repository on our API Management tenant.
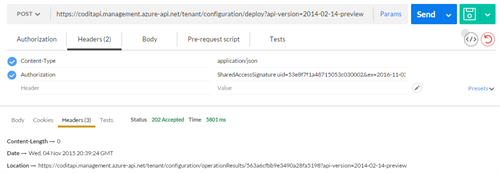
The final step is to deploy our configuration from the tenant repository to the APIM proxy.
This can operation can be done in two different ways:
- Use the “Deploy Repository Configuration” button on the APIM Admin Portal.
- Call the “Deploy” operation of the API Management REST API (here how to enable the REST API).
For this step I’m going to invoke the Configuration REST API using postman. Here the details of my API call.
| Method : POST Address : http://{tenantname}.management.azure-api.net/configuration/deploy?api-version=2014-02-14-preview Headers : + Content-Type > application/json + Authorization > SharedAccessSignature=…. Body : {“branch”:”master”} |
As response I got a 202 (Accepted) and the Location header with the link to the check the status of this transaction.
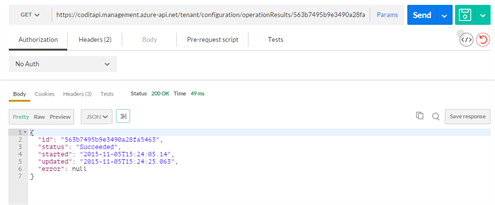
With the operationResults operation to check the status (Failed, InProgress, Succeded) of the deploy. It’s a GET and again we must specify the Authorization header as in the previous call.
If the deploy succeeded, the changes are immediately applied to the proxy.
Restore a configuration
Now, imagine that you’ve applied a wrong configuration to the proxy and you want to restore a previous version from your local git repository. For example, these are the timestamps of my configurations:
- On proxy: updated at 10:22 AM
- On Teneant Repo: updated at 10:18 AM
- Local repo: updated at 08:19 AM
I want to discard the 10:18 AM version and replace the 10:22 AM version with the 08:19 AM one. It’s a four step procedure.
A) First thing to do is to bring the tenant repo in sync with the proxy. This step is necessary to mark the proxy as synched. Without the sync you will get this error as result of the the deploy operation : “Deployment operation failed due to invalid data: Snapshot operation is not safe. Latest sync date: ‘2015-11-10T10:18:35.5278745’; latest configuration update date: ‘2015-11-10T10:22:01.7635694’“
B) Apply a modification to the local repo and commit it. This is necessary so the deploy procedure can recognize that there is something to be overwritten.
C) run the “git push -f origin master” command to overwrite the version in the tenant git.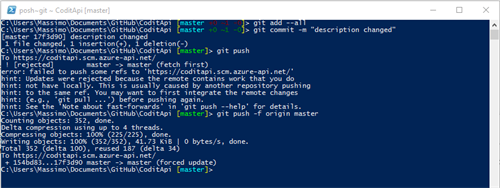
D) deploy the configuration using the Admin Portal or via REST API
Conclusion
The git integration is a feature that customers have been asking for a while. Now, you can create and manage different versions of your proxy configurations and move them between different environments.
Cheers,
Massimo
Subscribe to our RSS feed