In a High Availability scenario, however, you will want to cluster the master secret server as well. You can perfectly use the SQL Server Cluster for that purpose. Microsoft has outlined to steps for clustering the SSO server in this article.
However, in Azure, some additional steps are required, which will prevent you from running into the below error message:
The master secret server (cluster-resource-name) specified by the SSO database could not be found 0xC0002A0F Could not Contact the SSO Server %1.
In this article we will describe the steps to solve this problem. We assume the Always On cluster is already installed. If not, you can find directions here and here.
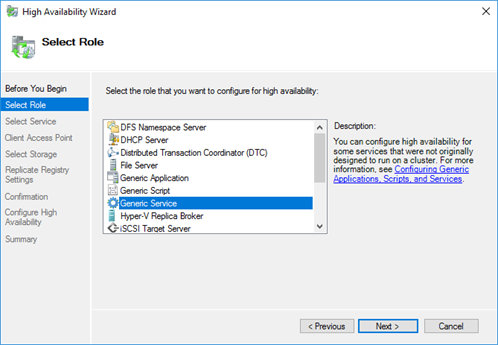
Add a generic service to the cluster
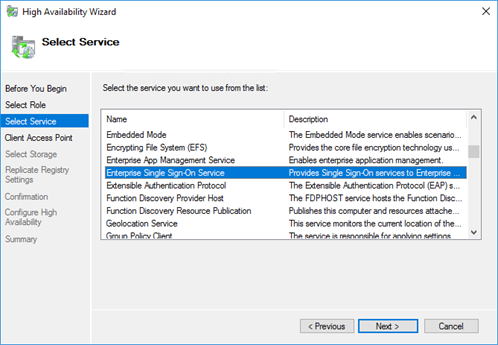
Navigate to the Failover Cluster Manager on one of the SQL-servers and go to the Roles-overview. Add an additional ‘Generic Service’-role to your SQL-cluster and select the ‘Enterprise Single Sign-On Service’-service from the list. Assign a name to the new role, for instance ‘SSO’.
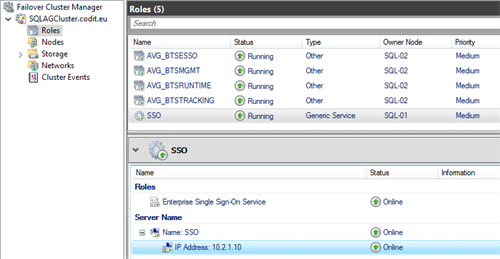
Once the role has been created, make sure to assign a static IP-address, by adjusting the properties of the ‘IP Address’-resource. In this case ’10.2.1.10’ was used:
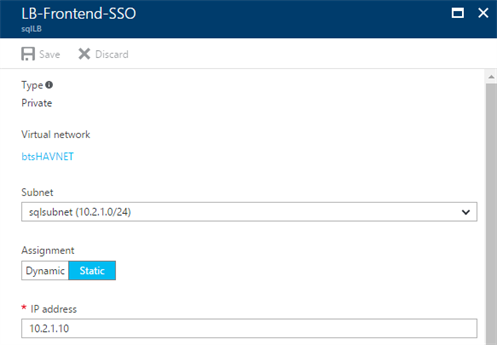
Add a new Frontend IP Pool to the load balancer
Navigate to the Internal Load Balancer by using the Azure portal and create a new Frontend IP Pool for the static IP address you assigned to the SSO cluster resource. Make sure to select the same subnet as the SQL-servers are located in.
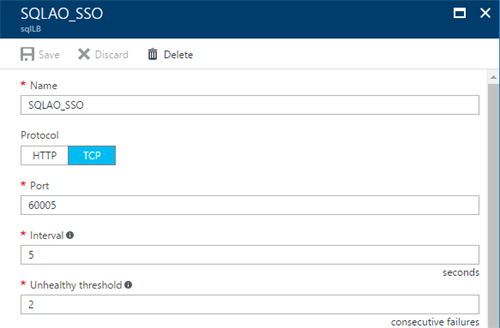
Next to the IP-address, an additional health probe needs to be created as well, as this will be used in the background to forward the request. Like previously created probes, create an additional probe, referring to an unused port. In this case, the port ‘60005’ has been chosen.
Finally create a new rule that maps port 135 to 135.

Make sure to also execute this PowerShell-command, to set several cluster-parameters for this SSO-role, similar as what should have been done for the SQL-roles. This time fill in the IP-address and name used for the SSO-cluster.
As was the case for the SQL-servers, this command only has to be executed on a single node within the cluster, as this will connect the load balancer’s health probe, as configured in the Azure Portal, to this cluster role.
Add Loadbalancer rules for each of the ports used by SSO
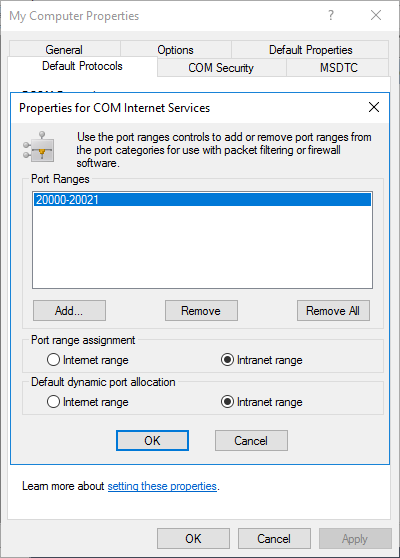
Because we need to create a load balancing rule for each of the ports used by SSO, we need to limit the range of ports that will be used. To do this, connect to the SQL-servers and perform these steps on all of the servers:
Open Component Services and navigate to ‘My Computer’ and open the properties.

Go to the ‘Default Protocols’-tab and click ‘Properties…’ and make sure to add a range of ports that is located in the ‘Intranet Range’
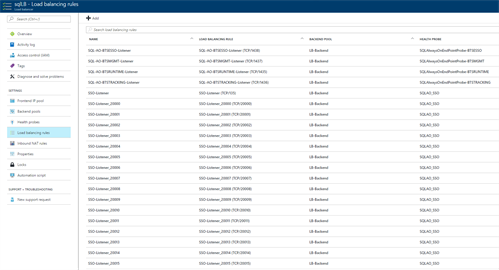
If the port range has been assigned, go back to the Azure Portal, to create the required rules, matching these ports. Make sure to connect these rules to the SSO-IP and SSO-probe we created in the previous step.
This will result into a ‘long’ list of load balancing rules for all the used ports:
Creating the loadbalancer rules manually is a tedious task. Luckily we can script it with PowerShell.
MSDTC
A similar action will be required for MSDTC, as a load balancing rule is required for all communication between the servers. However, for MSDTC you are able to specify a fixed TCP-port instead of a range of ports.
To do this, the below command can be executed, in order to add an entry in the registry to make sure that MSDTC will stick to port ‘20021’, in this case.
reg add HKLMSOFTWAREMicrosoftMSDTC /v ServerTcpPort /t REG_DWORD /d 20021 /f
Note: Afterwards a reboot of the servers might be required before this change in the registry will become active.
While we are at the process of editing the registry, let’s keep at it, because in order to ensure that COM+ will be accessible from all servers, the below command needs to be executed on all SQL- and BizTalk-servers as well.
reg add HKLMSOFTWAREMicrosoftCOM3 /v RemoteAccessEnabled /t REG_DWORD /d 1 /f
Note: Afterwards a reboot of the servers might be required before this change in the registry will become active.
Finally!
When all these configurations are in place, you should be able to go ahead and create a new redundant SSO system on your SQL Server Always On cluster.
Subscribe to our RSS feed