Recently I wrote about Kong, an open-source API gateway that is gaining a lot of momentum in the API world.
Today, I will show you how easy it is to get a single-node Kong cluster up and running on Microsoft Azure with Azure Container Instances and Azure Database for PostgreSQL.
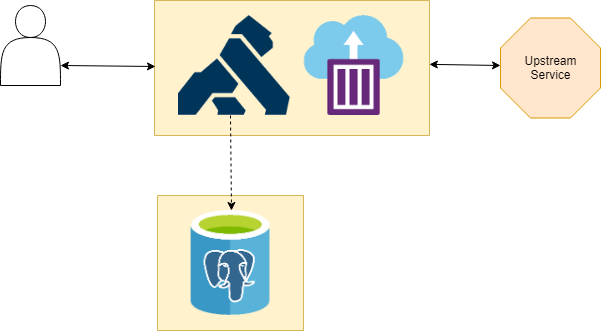
Hosting our Kong data store in Azure
Before we can start running our Kong cluster we need to provide a data store for it first. As of today, Kong allows you to use Cassandra or PostgreSQL.
One option would be to spin up VMs or deploy them as containers and host them ourselves, but I’m more of a “Microsoft will handle that for me” type of guy. I try to avoid having to maintain infrastructure while I don’t need to.
That’s why we can use these two PaaS offerings in Azure – Azure Database for PostgreSQL or Azure Cosmos Db. They both give you a database without having to worry about running it, we can just use it and pay for the service tier that we want.
Creating our data store instance
Unfortunately, Kong does not support the use of Azure Cosmos Db as a data store due to some missing features in the Cassandra API. If you want to see this supported, head over and give a :+1:!
However, setting up a new Azure Database for PostgreSQL database is super easy:
- Go to the Azure Portal.
- Create a new “Azure Database for PostgreSQL” instance.
- Go to “Connection Security” and enable access to Azure services.
- Create a new database called “kong” by using your favorite tool.
Running our Kong cluster on Azure Container Instances
Now that our data store is provisioned we are ready to roll! The only thing we need to do is to run the initial database migrations.
In order to do that, we need to run an instance of the Kong image against our DB as a one-off job.
One possibility to achieve this is to run it locally, but that would be boring and less efficient.
Azure Container Instances is a perfect fit for this. This is where we can create an instance via the CLI and tell it to die afterward:
Next, we can start our single-node cluster on Azure as well. This can basically be any container platform on Azure – be it Azure Service Fabric Mesh, Azure Container Instances, Azure Kubernetes Service or Azure Web Apps for Containers.
To keep it simple, we’ll stick with Azure Container Instances for now where we can provision it via the CLI:
This will expose a Kong instance on kong-gateway.westeurope.azurecontainer.io serving the proxy on port 8000 (HTTP) & 8443 (HTTPS), but also management API on 8001 (HTTP) & 8444 (HTTPS).
Careful – You should make sure nobody can access your Admin API on the default ports as this has security implications.
We can get the cluster configuration via the API:
Serving Open Brewery DB API to our customers via Kong Proxy
Now that our proxy is ready we will configure it to serve data from the Open Brewery DB API to our customers.
In order to do that, we will create a breweries service which can be served for all requests to apis.breweries.com.
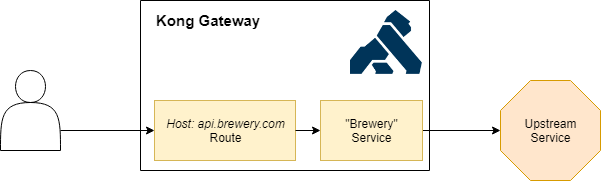
Let’s start by creating our breweries service which will get data from https://api.openbrewerydb.org/breweries:
Once the service is there, we can route traffic to it via a route. This will make sure that the consumer’s request ends up with the correct service.
We can configure this by adding a route to the service that we’ve just created:
Note that in this case we are telling it to use the hosts header as a routing mechanism to determine the match, but you can also use routing via uri path or method as documented here.
That’s how easy it is to proxy traffic to an upstream system! If we now do a GET request with apis.breweries.com as a Host header we will get a list of breweries:
The world loves beer so there is a ton of them so I redacted the response but you get the idea!
As you might have noticed, the response includes not only the standard HTTP headers but also the ones from api.openbrewerydb.org and Kong giving more information.
This is always a hard choice to make – should we include them or remove them. I’m always leaning towards reducing the responses to what is required as we don’t want to leak information about our dependencies, but it’s all configurable anyway.
Time to make our API a bit more advanced!
Making our API robust with Kong Plugins
We have a Kong gateway setup that will serve traffic from Open Brewery DB API to everybody who’s interested – great!
Since we want to monetize our API, we’d like to enforce consumers to authenticate first and return a correlation id which can be used to create a support ticket.
Unfortunately, we cannot change the upstream API to do this but luckily Kong provides the capability to deploy plugins.
These are a great way to extend existing systems by deploying logic on the gateway.
In our case we will deploy two of them:
correlation-idplugin – It will generate and include a correlation id in theX-Request-IDresponse headerkey-authplugin – It will enforce consumers to authenticate via an API key
As mentioned in my previous article, plugins can be applied on a variety of levels but today we will enforce them on all our services.
Automatically adding correlation ids
Installing plugins are only an API call away:
As you can see, the only thing we need to do is specify which plugin we want to install, and how it should be configured.
When we call our breweries service again, you’ll notice that the X-Request-Id is added automatically:
Enforcing API key authentication
Kong comes with a variety of security plugins to enforce authentication and handle authorization.
In our case we will use the key-auth plugin to enforce API key authentication:
Once the plugin is installed, all requests are forced to specify an API key or will receive a HTTP 401 Unauthorized.
In order to have an API key, we need to create a consumer for the user and generate a key for him.
Let’s first create a consumer on the gateway for tom:
Once created, we can create a key on the consumer:
When we call the service again and add apikey=qiKAX9iogSlu6pKxyfbSCp2LjPqzwC3k as a query parameter we receive a list of breweries again:
Getting an overview of installed plugins
It’s always good to keep track of which plugins are installed, certainly if they are applied on different levels.
Kong provides you with the capability to list all of the installed plugins, for example here you can see all of them on a gateway level:
Conclusion
In a matter of minutes, we were able to spin up a single-node Kong cluster that runs on Microsoft Azure and serving traffic from www.openbrewerydb.org!
By using Azure Database for PostgreSQL we could easily spin up a PostgreSQL database to store the metadata for our gateway that is running on Azure Container Instances.
We’ve also seen how easy it is to create a service, route consumer traffic to it and make it more robust with plugins.
It’s good to note that Microsoft Azure is not an officially supported cloud runtime by Kong (yet), but you can find all Azure related docs on Kong Hub – let me know if you’re missing something!
Although this example is not rocket science I think it shows how easy it is to use Kong and quickly get started, however, I’ve found that the documentation is very API-centric and sometimes lacks the high-level picture of how everything ties together – but that can be improved.
In a later blog post, we’ll have a look at how Kong and Azure API Management relates to each other and where they both shine.
Thanks for reading,
Tom.
Subscribe to our RSS feed