At first, I thought this could be achieved by using a messaging-only interface, in which we would have the following setup.
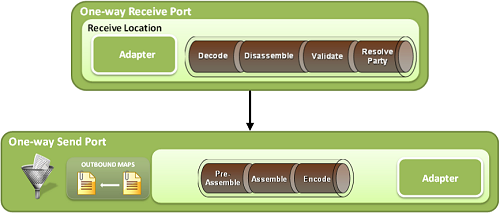
The flat file message containing the invoices would be received by the Receive Port and transformed into XML. The Send Port would then subscribe to the message type, map the data into the desired EDI format and send out one file containing all the invoices.
The Problem
However, the EDI schemas are setup as a single entity, meaning that it is not possible to map multiple invoices to one EDI message. A simple solution would be to let the Receive Pipeline debatch the received flat file message into single invoices and process each message separately. This solution would mean that for every invoice in the received flat file message, one EDI message would be sent out to their customer. As this was not according to the requirements this solution was not an option.
We were left with two options, one would be to use the standard EDI batching functionality and leverage the ‘Microsoft.BizTalk.Edi.BatchingOrchestration.BatchingService’ orchestration. This orchestration is available when EDI is configured on the BizTalk Server and can be found in the ‘BizTalk EDI Application’.
The other option would be to use the ‘X12_BatchSchema.xsd’ in our project and create an XSLT mapping to generate the EDI output message containing all the received invoices. This solution requires that you set the interchange control number and transaction set control numbers as BizTalk will not handle this for you. This means that we would have to track these numbers ourselves in a database, this was also not an option for our customer.
The Solution
So we were left with one option, to leverage the ‘Microsoft.BizTalk.Edi.BatchingOrchestration.BatchingService’ orchestration to create the outgoing batch file for us. For this we used the following setup.
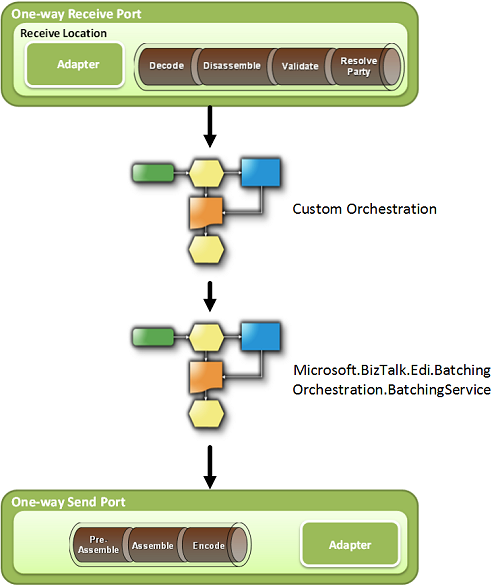
The flat file message containing the invoices is received by the Receive Port and transformed into XML without being debatched. The orchestration has a subscription on the message type and will process the received message. The main functionality of the custom orchestration is to debatch the received file, loop over every invoice in the message, map the invoice to its EDI format and publish the message to the MessageBox with several promoted properties on the message. The Microsoft.BizTalk.Edi.BatchingOrchestration.BatchingService orchestration will receive all of the separate invoices through the promoted properties and aggregate them.
When the custom orchestration is done processing all of the separate invoices, it will publish a so-called ‘control message’ to the MessageBox. This control message will tell the Microsoft.BizTalk.Edi.BatchingOrchestration.BatchingService orchestration to stop collecting messages and publish all of the batched data to the MessageBox. The Send Port will send the batched EDI message to the customer.
Batching Configuration
To leverage the Microsoft.BizTalk.Edi.BatchingOrchestration.BatchingService we need to setup batching in the Party configuration. In the properties of the EDI Agreement there is a ‘Batch Configuration’ tab. Create a new batch and fill in a name for the batch, a filter (I have used ‘BTS.ReceivePortName == Dummy’ as we will communicate with the BatchingOrchestration from our own orchestration) and tick the ‘Start Immediately’ option.
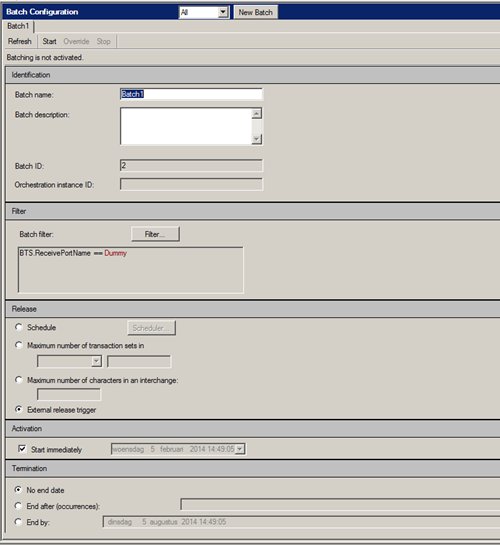
Once you click ‘Apply’ the batch will be created and it will receive a Batch ID. Remember this Batch ID as we will need it later. Also, the status ‘Batching is not activated’ is shown. Click on the ‘Start’ button and the status will change to ‘A control message is waiting to be processed’, wait for a moment and click ‘Refresh’. The status will change to ‘Batching is activated’ and the Orchestration Instance ID will be filled.
Check the running instances to verify that the BatchingOrchestration is running.
![]()
Custom Orchestration
Now that the batching is enabled let’s take a look at our custom orchestration.
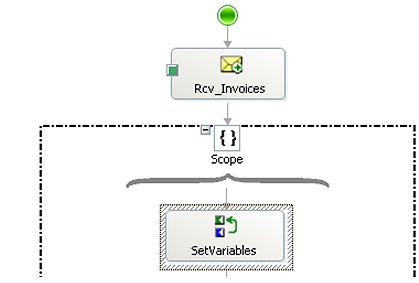
The orchestration starts by receiving the message containing all of the invoices. After receiving the message the following code is executed in the SetVariables shape.
ediBatchId = 2;
ediControlActionType = “EdiBatchOverride”;
ediEncodingType = 0;
ediToBeBatched = true;
loopCounter = 1;
numberOfItems = System.Convert.ToInt32(xpath(msgInvoices, “count(/*[local-name()=’Invoices’]/*[local-name()=’Items’]/*[local-name()=’Item’])”));
This code will set several orchestration variables and count the amount of invoices in the received message. Note that the orchestration variable ‘ediBatchId’ has been set to the Batch ID that was assigned to the batch we created several steps ago.
Note: as this code is a sample the orchestration variable ediBatchId has been hardcoded, normally this value would be stored and retrieved from SSO.
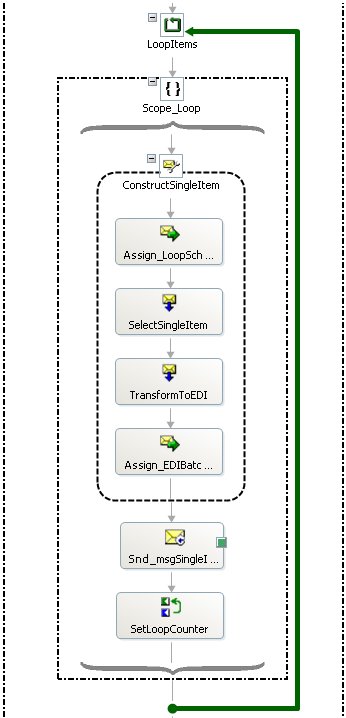
The next step of the custom orchestration contains the actual message processing. First we create a helper message in the ‘Assign_LoopSchema’ shape by using the following code.
xmlDoc.LoadXml(“<ns0:LoopSchema xmlns:ns0=”http://Edi.Documents.LoopSchema”><Counter>” + System.Convert.ToString(loopCounter) + “</Counter></ns0:LoopSchema>”);
msgLoopSchema = xmlDoc;
This schema will be used in the next map to iterate through the invoices from the received message so that we can create a single outgoing EDI message.
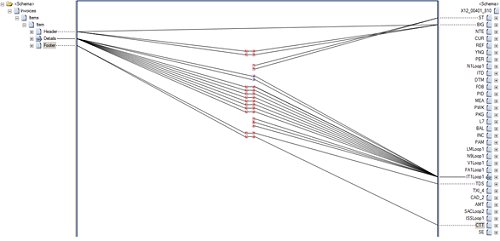
In the ‘SelectSingleItem’ shape a map is executed which uses the following XSLT code.
<xsl:template name=”SelectSingleItem”>
<xsl:param name=”counter” />
<xsl:copy-of select=”/*[local-name()=’Root’]/*[local-name()=’InputMessagePart_1′]/*[local-name()=’Invoices’]/*[local-name()=’Items’]/*[local-name()=’Item’][position()=$counter]” />
</xsl:template>
This XSLT code will select the desired invoice and copy this invoice to the output message. The result is an output message with one single invoice.
In the ‘TransformToEDI’ shape the single invoice is mapped to its EDI format using a BizTalk map.
In the ‘Assign_EDIBatchingProperties’ shape the following code is executed.
msgSingleInvoiceEDI(EDI.ToBeBatched) = true;
msgSingleInvoiceEDI(EDI.EncodingType) = 0;
msgSingleInvoiceEDI(EDI.BatchId) = ediBatchId;
The EDI.ToBeBatched, EDI.EncodingType and EDI.BatchId are promoted to the message we just created in the map. These properties are promoted so that the Microsoft.BizTalk.Edi.BatchingOrchestration.BatchingService receives the message through its subscription.
Next, the msgSingleInvoiceEDI is sent to the MessageBox and the loopCounter variable is incremented by one. Do not forget to use a correlation set on the send shape to properly promote the EDI.ToBeBatched, EDI.EncodingType and EDI.BatchId properties to the message.
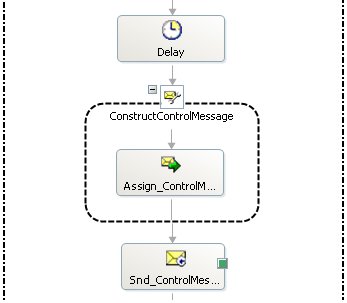
The orchestration has now sent out all of the invoices and the loop is finished. The next step is to send the control message so that the Microsoft.BizTalk.Edi.BatchingOrchestration.BatchingService stops collecting messages and publishes its batched EDI message.
The Delay shape has been set to 30 seconds. The Delay shape is necessary because while testing the solution the situation might occur where not all of the single invoices had been processed in the Microsoft.BizTalk.Edi.BatchingOrchestration.BatchingService orchestration before the control message was received, thus not all of the invoices would be present in the EDI batch.
The control message is created in the ‘Assign_ControlMessage’ shape.
xmlDocControl.LoadXml(“<PAM_Control xmlns=”http://SQLControlMessage.IssueSelect”><EdiMessageType>” + System.Convert.ToString(ediEncodingType) + “</EdiMessageType><ActionType>” + ediControlActionType + “</ActionType><UsedOnce>0</UsedOnce><BatchId>” + System.Convert.ToString(ediBatchId) + “</BatchId><ToBeBatched>” + System.Convert.ToString(ediToBeBatched) + “</ToBeBatched></PAM_Control>”);
msgControlMessage = xmlDocControl;
msgControlMessage(EDI.BatchId) = ediBatchId;
msgControlMessage(EDI.ControlActionType) = ediControlActionType;
msgControlMessage(EDI.EncodingType) = ediEncodingType;
msgControlMessage(EDI.ToBeBatched) = ediToBeBatched;
The orchestration variables that were set at the beginning of the orchestration are now used in the creation of the control message. Do not forget to use a correlation set on the send shape to properly promote the EDI.ToBeBatched, EDI.EncodingType, EDI.ControlActionType and EDI.BatchId properties to the message.
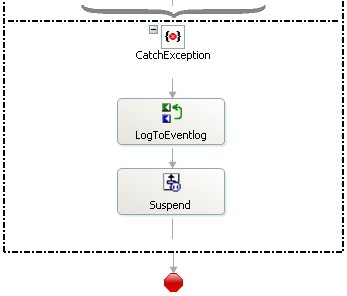
The final part of the orchestration contains some error handling. Any exception will be caught and logged to the eventlog and the orchestration will be suspended.
Send Port
To send out the EDI batch file we will need to set some specific filters on the Send Port.
By using the following filters we can subscribe to the EDI batch message that is published from the Microsoft.BizTalk.Edi.BatchingOrchestration.BatchingService orchestration.
| Property | Value |
|---|---|
| EDI.ReceiverPartyName | Thename of the party receiving the EDI batch file |
| EDI.SenderPartyName | The name of theparty sending the EDI batch file |
| EDI.BatchName | Thename of the batch |
| EDI.ToBeBatched | False |
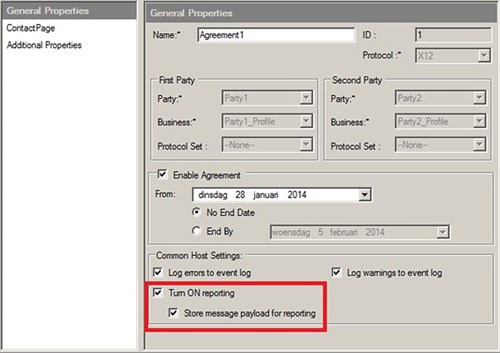
Tracking Options
The solution is now finished. By enabling reporting we can access tracking data on the Microsoft.BizTalk.Edi.BatchingOrchestration.BatchingService orchestration.
The reporting can be enabled on the properties of the Party.
By using the ‘Batch Status’ query in the BizTalk Administration Console we can show the batch data. I will show this by testing a flat file containing 329 invoices. Once this file is published to the MessageBox it will be processed by our custom orchestration, which will publish the single invoices to the MessageBox. These will in turn be processed by the Microsoft.BizTalk.Edi.BatchingOrchestration.BatchingService orchestration and will finally be sent to a file location after the custom orchestration has sent the control message.
By using the following query we can track the invoices as they are processed.
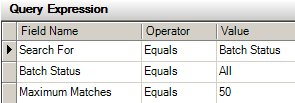
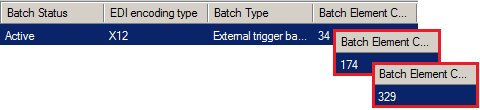
As shown below we can see an active batch with its Batch Element Counter increasing as our custom orchestration is publishing all its invoices.
When our custom orchestration is done processing invoices it will wait for 30 seconds and then publish the control message. This will cause the Microsoft.BizTalk.Edi.BatchingOrchestration.BatchingService to publish all its data to the MessageBox in a batched EDI message. The batch will then have the ‘Completed’ status and, as expected, the output EDI file containing all of our invoices has also been sent successfully.

Finally, the ‘Batch Status’ query in the BizTalk Administration Console contains some other interesting functions. By right clicking on our completed batch we can access the interchange, which in turn allows us to access the Transaction Set Details.
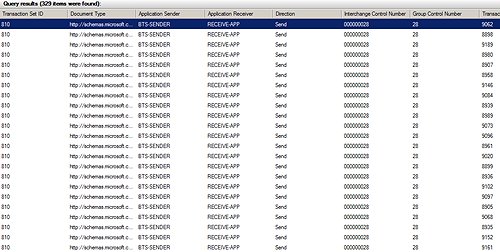
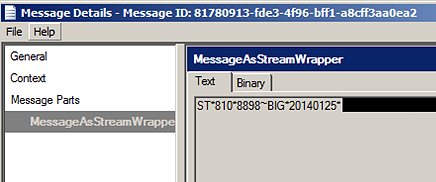
Here we can view how many invoices were in our batch message and we can inspect the content of each invoice by right clicking on the Transaction Set and selecting ‘View Transaction Set Content’.
So our solution now also contains some nice tracking options which would not have been available if we decided to not use the Microsoft.BizTalk.Edi.BatchingOrchestration.BatchingService orchestration.
Subscribe to our RSS feed