Introduction
WebSocket is a protocol that provides a mechanism to establish a two-way interactive communication session between the client’s browser and a server, using only a single TCP connection.
This allows the use of WebSocket on a variety of web applications such as games, stock charts displaying live data, chat rooms, collaborative editing of documents, etc.
We will use SignalR, a library that simplifies adding real-time web functionality to apps that makes use of WebSockets, to create a chat room and communicate with it via the API Management WebSockets feature.
To learn more about SignalR, check out our SignalR blog post: Messaging with Azure SignalR & ASP.NET 5.
Creating the SignalR Chat Room App
The first move is to create an Azure SignalR Service in Azure. To do this, we followed Microsoft’s guide on how to create a new Azure SignalR Service (Quickstart to learn how to use Azure SignalR Service).
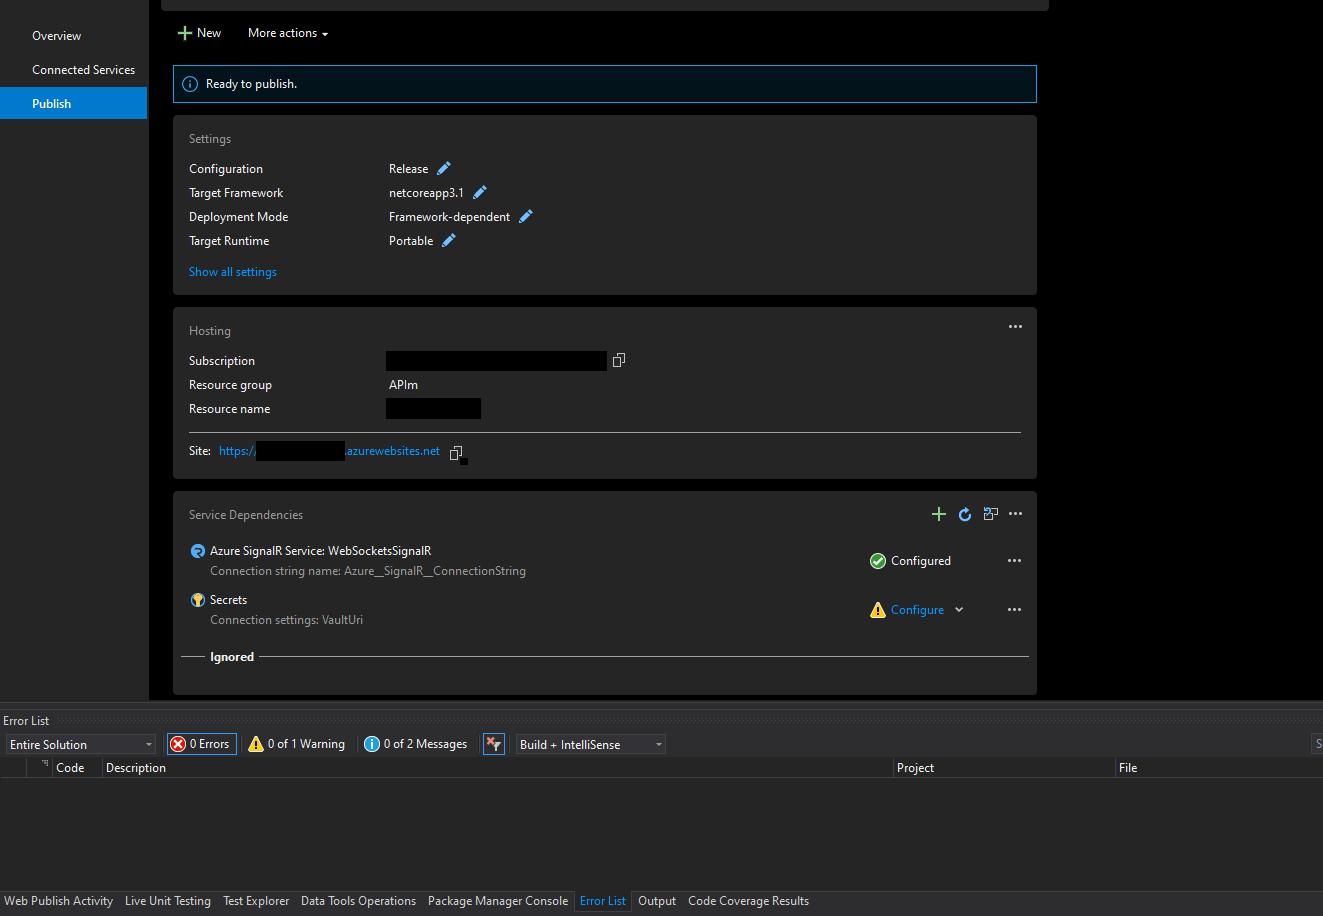
Then we will download Microsoft’s sample SignalR chat room app from GitHub (click here) and publish it in Azure as a Web App. It will look something like the following in your visual studio after you configure the Azure SignalR Service and select the newly created Azure SignalR Service:
That’s it for our SignalR Chat Room App. Next we will see how SignalR handles its communication part.
SignalR Communication Handling
In order to talk to SignalR, we must negotiate with the server (in the following image API Management plays the role of Client):

For more details on Azure SignalR Service Internals, visit this page, from which the image above was retrieved: SignalR Concept Internals.
To do the negotiation what API Management needs to do is send a request with GET Method to https://<AzureWebAppName>.azurewebsites.net/<HubName>/negotiate?negotiateVersion=1 server to obtain some information which we will see in detail:
With the information above we now have enough information to build the URL that we will need to negotiate with the SignalR server directly, so we will send a request with POST method to the url: https://<AzureSignalRName>.service.signalr.net/client/negotiate?hub=<HubName>&asrs.op=<OperationName>&negotiateVersion=1&asrs_request_id=<RequestId>
This POST request doesn’t have a body and it must have an Authentication header. The value of the header is the JwtToken and we will receive the following data:
Now, all we have to do is talk with the server. To allow this we will set our backend to: wss://<AzureSignalRName>.service.signalr.net/client/?hub=<HubName>&asrs.op=<OperationName>&negotiateVersion=1&asrs_request_id=<RequestId>&id=<ConnectionId>&access_token=<JwtToken>
To explain the above in a simpler way is to say:
- We send a GET request to the negotiate endpoint of the Web App that is published in Azure.
- Web App responds with a JwtToken and a URL from which we will extract information.
- We send a new POST request to the /client/negotiate endpoint of this URL (which is the Azure SignalR Service URL) that we’ve got from the Web App along with its hub, asrs.op, negotiateVersion and asrs_request_id query parameters.
- The Azure SignalR Service returns a connection id.
- We can now have our full WebSocket URL and query parameters.
Creating a WebSocket API
Since we now have a deeper understanding of how the communication is handled between Web App and Azure SignalR Service, we can now do this communication via API Management ourselves. First, however, we will learn how to create a new WebSocket API using API Management’s latest feature.
To begin, we will need to go to our API Management in Azure Portal and under APIs, we click APIs and then click + Add API and we will see the following: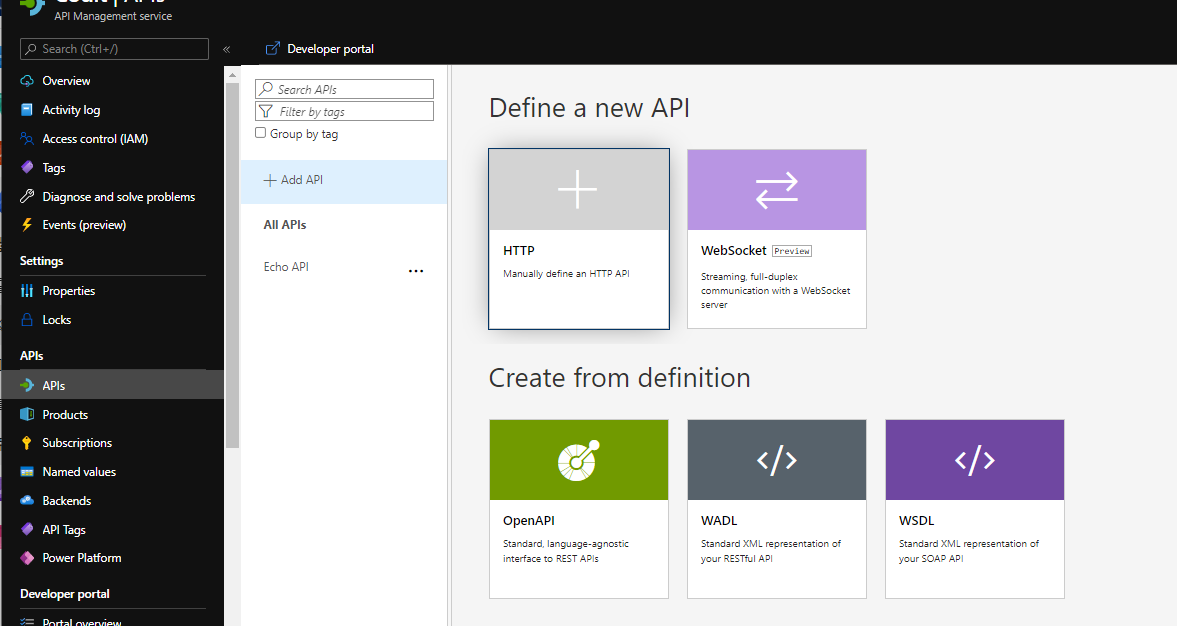
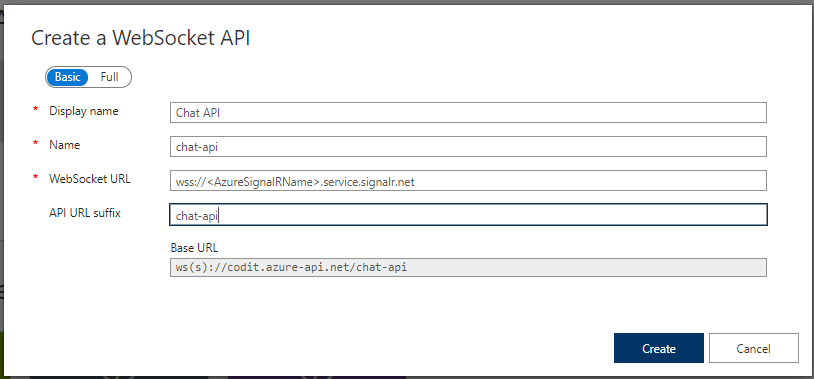
When we click on WebSockets, a form will pop out, and so we just need to fill the fields and click create:
With our WebSocket API created in API Management, we can edit the onHandshake operation policy. This is the only operation that exists for WebSocket API Management APIs.
If you are wondering why we only have this one operation, it’s because, at least at the moment of writing, all API Management is doing for us is creating a communication bridge between our backend WebSocket API and our customer’s client.
Putting API Management in front of our WebSocket API allows us to centralize cross-cutting concerns such as security (by throttling), monetization (by productizing the APIs) and more.
Communication between API Management and the Chat App
As explained before, we need to handle negotiation with our Azure SignalR Service in order to communicate. So now we need to send a request to our Azure Web App and we will do this by using the send-request on the inbound section of our onHandshake API Management policy:
We will then receive a response containing our Azure SignalR Service Url and a JwtToken that we will be using to send a POST request to our Azure SignalR Service:
From here we will get a response that is stored in the clientNegotiationResponse variable which contains our final piece of the puzzle, the connection id.
All that’s left is to point to our backend and add the necessary query parameters:
The client can now communicate with our Chat App via API Management’s WebSocket API. However, to initiate conversations it must first send the following WebSocket message since API Management, at the time of writing this post, can’t send WebSocket messages on onHandshake through API Management Policies:
Note: The last character code in every SignalR message is 0x1E in hexadecimal.
Testing
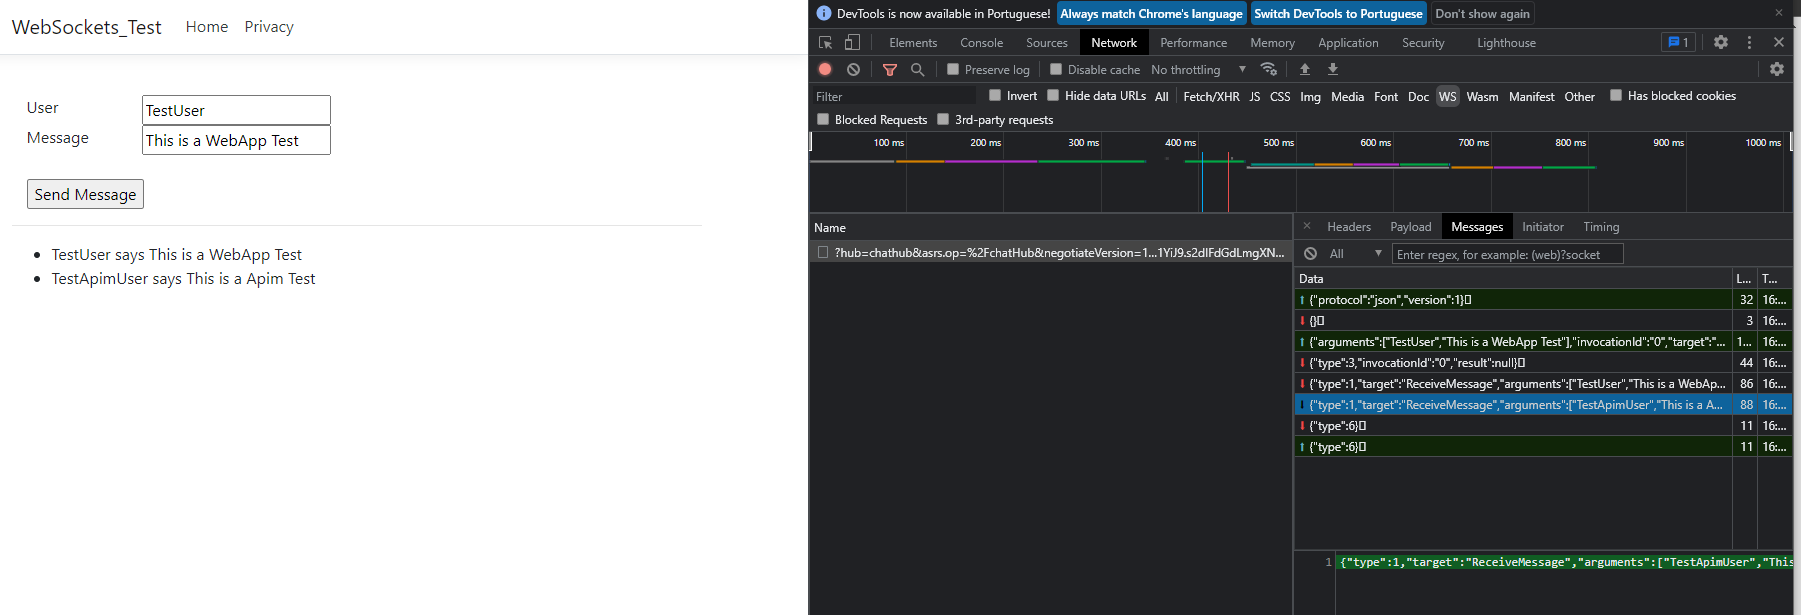
To test our app, we went to our Azure Web App and typed a message:
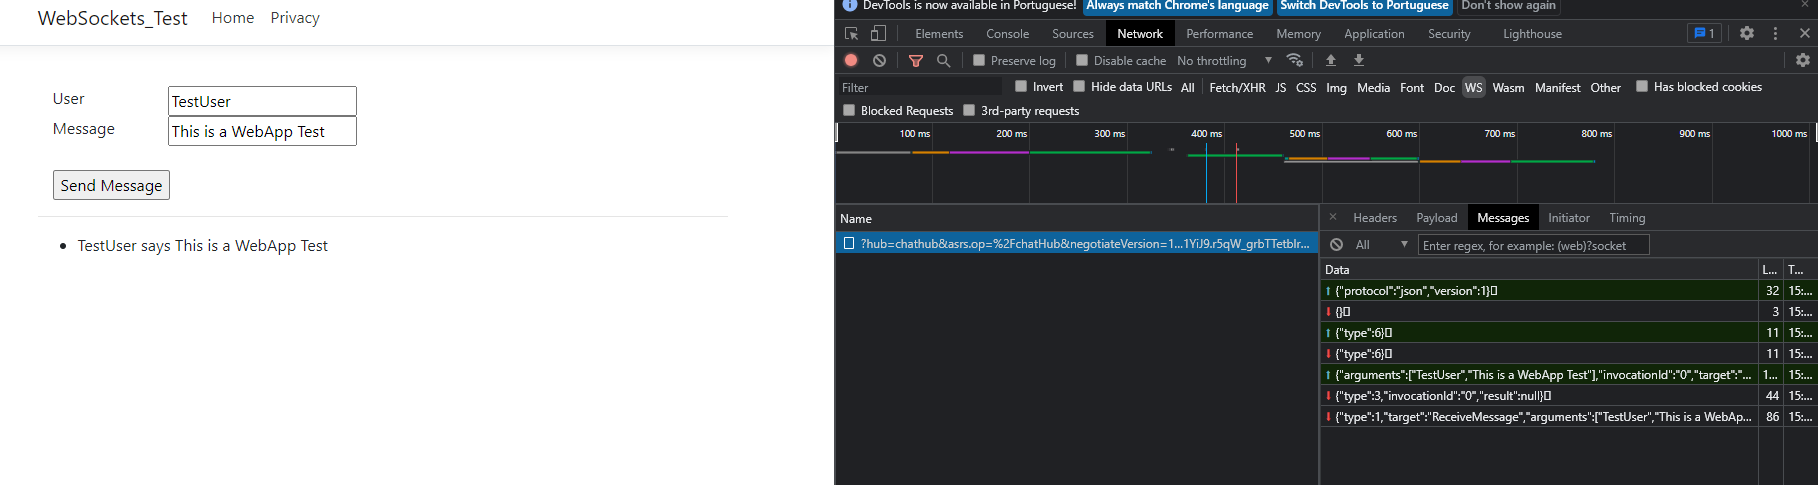
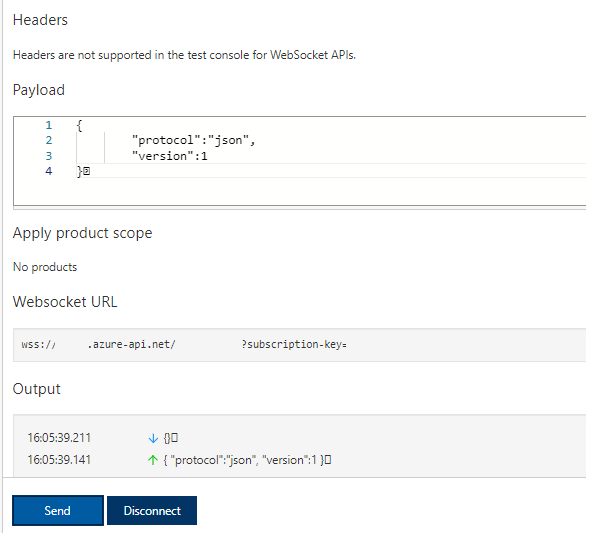
As you can see above the Azure Web App started communications with our Azure SignalR Service with the message that states the protocol and the version.
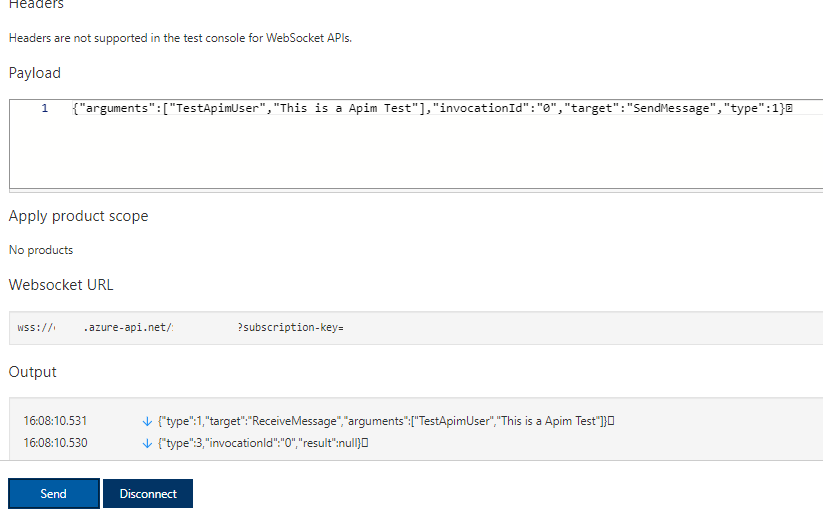
Upon pressing the send button we see the message containing the target (SendMessage method), invocationId = 0, type = 1, and the arguments (if you want to know what are these arguments and what they represent, they are the arguments of our SendMessage method that lives in the <HubName> C# class, which are the user and message in the case of our sample chat app).
This message was followed by an echo reply from our chat app, as seen above when we look at the message with target ReceiveMessage.
We then went to the test tab of our API Management WebSocket API, pressed connect:
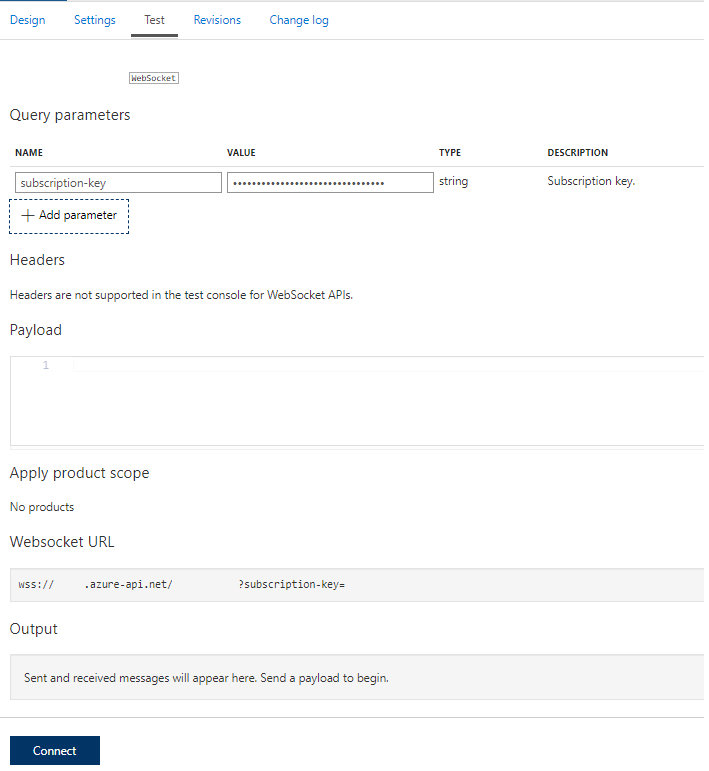
After connecting we sent the protocol and the version as well to keep us connected:
Since we are now connected and sent the protocol + version message the backend allows us to stay connected and all we did was send the message sent by our Web App with a different user and message:
Looking at our Azure Web App we can see that it received our API Management message:
We successfully connected to SignalR, sent and we can receive messages via API Management, so we can apply the same steps to other SignalR Apps and take advantage of everything the API Management WebSockets feature has to offer.
Subscribe to our RSS feed