Introduction
I’ve created this walkthrough mainly because I had difficulties to fully understand how it works. The documentation does not seem 100% complete and some blog posts I’ve read created some confusion for me. This is a high-level overview of how it works:
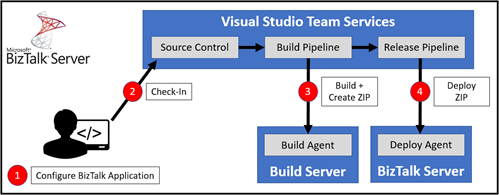
- The developer must configure what assemblies and bindings should be part of the BizTalk application. Also, the order of deployment must be specified. This is done in the new BizTalk Application Project.
- The developer must check-in the BizTalk projects, including the configured BizTalk Application Project. Also, the required binding files must be added to the chosen source control system.
- A build is triggered (automatically or manually). A local build agent compiles the code. By building the BizTalk Application Project, a deployment package (.zip) is automatically generated with all required assemblies and bindings. This deployment package (.zip) is published to the drop folder.
- After the build completed, the release can be triggered (automatically or manually). A local deploy agent, installed on the BizTalk server, takes the deployment package (.zip) from the build’s drop folder and performs the deployment, based on the configurations done in step 1. Placeholders in the binding files are replaced by VSTS environment variables.
Some advice:
- Make a clear distinction between build and release pipelines!
- Do not create and check-in the deployment package (.zip) yourself!
You can follow the steps below to set up full continuous deployment of BizTalk applications. Make sure you check the prerequisites documented over here.
Create a build agent
As VSTS does not support building BizTalk projects out-of-the-box, we need to create a local build agent that performs the job.
Create Personal Access Token
For the build agent to authenticate, a Personal Access Token is required.
- Browse to your VSTS home page. In my case this is https://toonvanhoutte.visualstudio.com
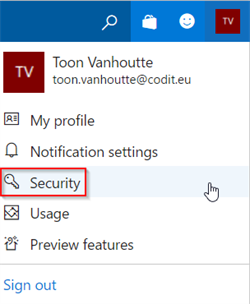
- Click on the profile icon and select Security.
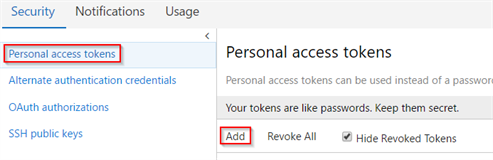
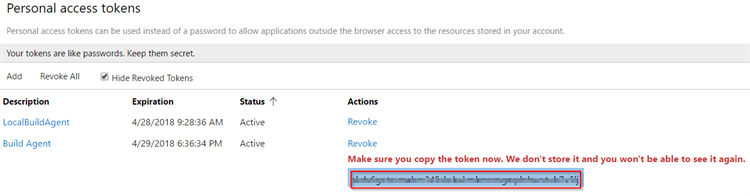
- Select Personal access tokens and click Add
- Provide a meaningful name, expiration time and select the appropriate account. Ensure you allow access to Agent Pools (read, manage).
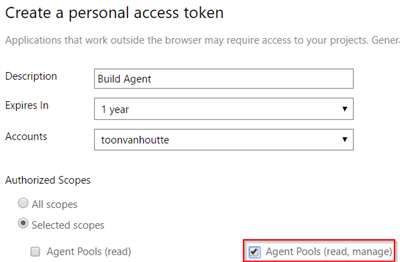
- Click Create Token
![]()
- Ensure you copy the generated access token, as we will need this later.
Install local build agent
The build agent should be installed on the server that has Visual Studio, the BizTalk Project Build Component and BizTalk Developer Tools installed.
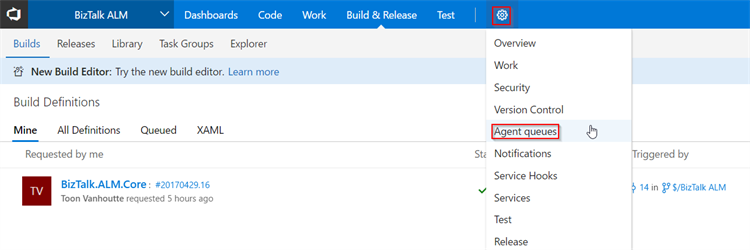
- Select the Settings icon and choose Agent queues.
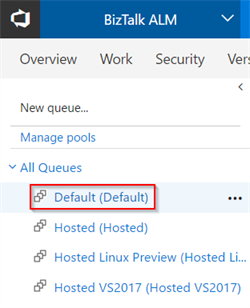
- Select the Default agent queue. As an alternative, you could also create a new queue.
- Click on Download agent
- Click Download. Remark that the required PowerShell scripts to install the agent are provided.
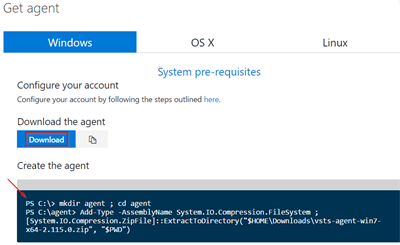
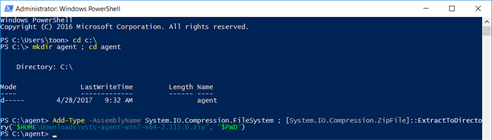
- Open PowerShell as administrator on the build server.
Run the following command to unzip and launch the installation:
mkdir agent ; cd agent
Add-Type -AssemblyName System.IO.Compression.FileSystem ; System.IO.Compression.ZipFile]::ExtractToDirectory(“$HOMEDownloadsvsts-agent-win7-x64-2.115.0.zip”, “$PWD”)
- Execute this command to launch the configuration:
.config.cmd - Provide the requested information:
> Server URL: https://toonvanhoutte.visualstudio.com
> Authentication: PAT
> PAT: The personal access token copied in the previous step

- Press enter for default pool
- Press enter for default name
- Press enter for default work folder
- Provide Y to run as a service
- Provide user
- Provide password
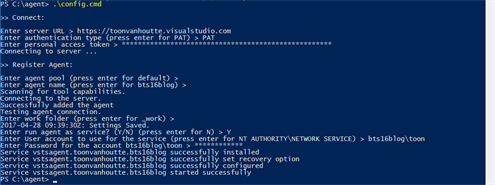
- Double check that the local build service is created and running.
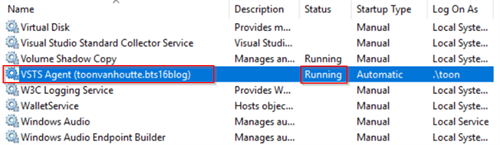
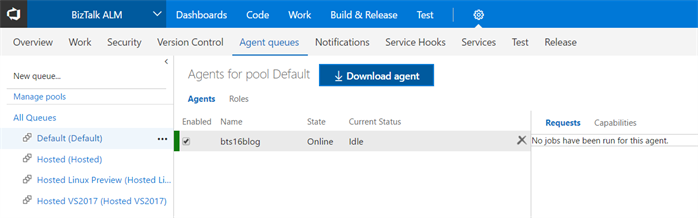
- If everything went fine, you should see the build agent online!
Create a build definition
Let’s now create and configure the required build definition.
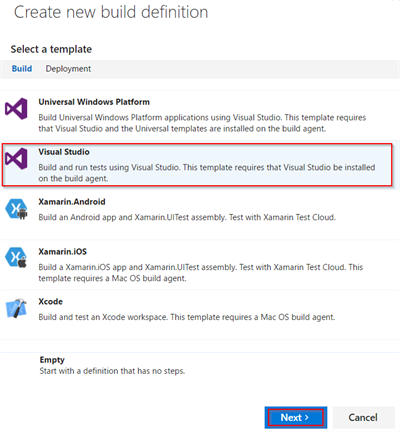
- In the Builds tab, click on New to create a new build definition.

- Select Visual Studio to start with a pre-configured build definition. Click Next to continue.
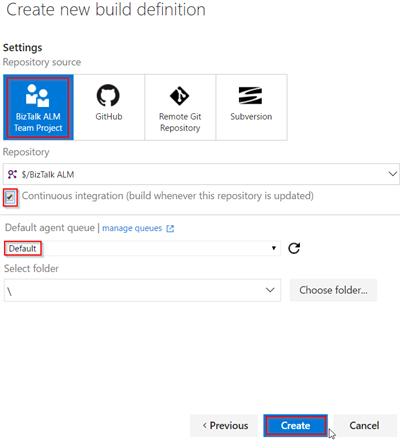
- Select your Team Project as the source, enable continuous integration, select the Default queue agent and click Create.
- Delete the following build steps, so the build pipeline looks like this:
> NuGet Installer
> Visual Studio Test
> Publish Symbols
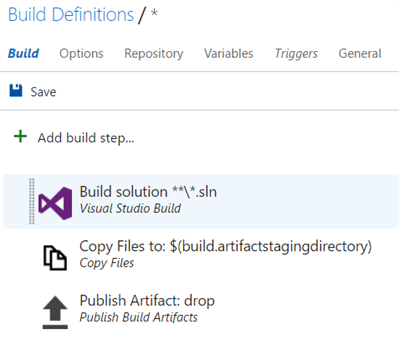
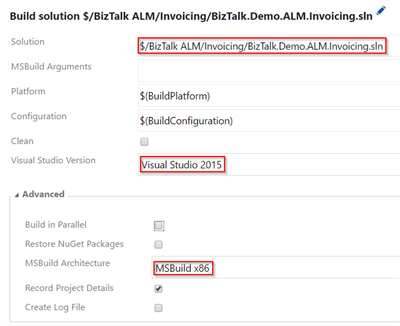
- Configure the Visual Studio Build step. Select the BizTalk solution that contains all required artifacts. Make sure Visual Studio 2015 is picked and verify that MSBuild architecture is set to MSBuild x86.
- The other build steps can remain as-is. Click Save.
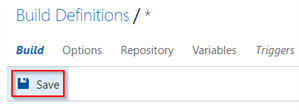
- Provide a clear name for the build definition and click OK.
- Queue a new build.
![]()
- Confirm with OK.

- Hopefully your build finishes successful. Solve potential issues in case the build failed.

Configure BizTalk Application
In this chapter, we need to create and configure the definition of our BizTalk application. The BizTalk Server 2016 Feature Pack 1 introduces a new BizTalk project type: BizTalk Server Application Project. Let’s have a look how we can use this to kick off an automated deployment.
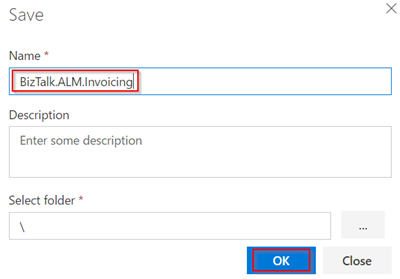
- On your solution, click Add, Add New Project.
- Ensure you select .NET Framework 4.6.1 and you are in the BizTalk Projects tab. Choose BizTalk Server Application Project and provide a descriptive name.
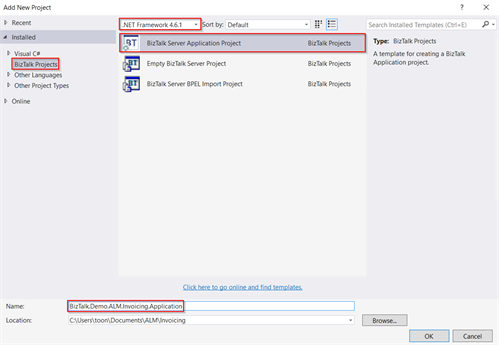
- Add references to all projects that needs to be included in this BizTalk application and click OK.
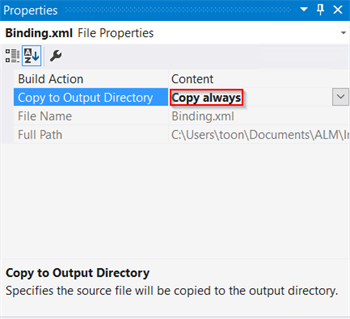
- Add all required binding files to the project. Make sure that every binding has Copy to Output Directory set to Copy Always. Via this way, the bindings will be included in the generated deploy package (.zip).
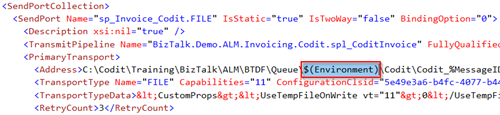
- In case you want to replace environment specific settings in your binding file, such as connection string and passwords, you must add placeholders with the $(placeholder) notation.
- Open the BizTalkServerInventory.json file and configure the following items:
> Name and path of all assemblies that must be deployed in the BizTalk application
> Name and path of all binding files that must be imported into the BizTalk application
> The deployment sequence of assemblies to be deployed and bindings to be imported.
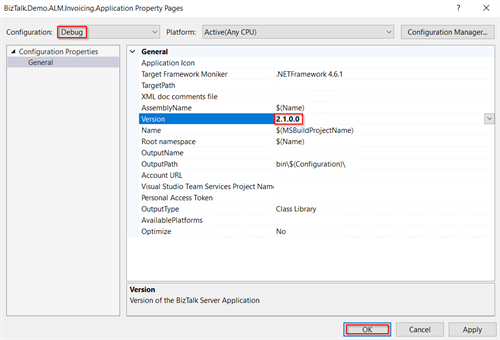
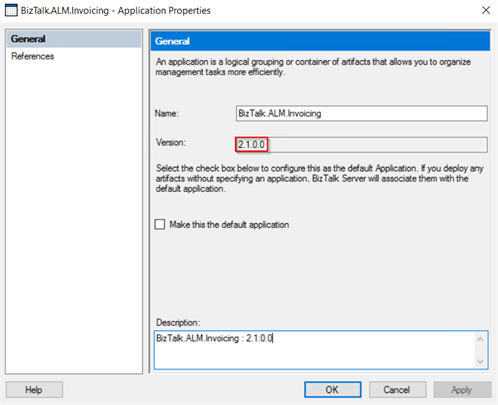
- Right click on the BizTalk Application Project and choose Properties. Here you can specify the desired version of the BizTalk Application. Be aware that this version is different, depending whether you’re building in debug or release mode. Click OK to save the changes.
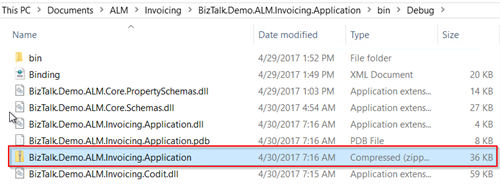
- Build the application project locally. Fix any errors if they might occur. If the build succeeds, you should see a deployment package (.zip) in the bin folder. This package will be used to deploy the BizTalk application.
- Check-in the new BizTalk Application Project. This should automatically trigger a new build. Verify that the deployment package (.zip) is also available in the drop folder of the build. This can be done by navigating to the Artifacts tab and clicking on Explore.
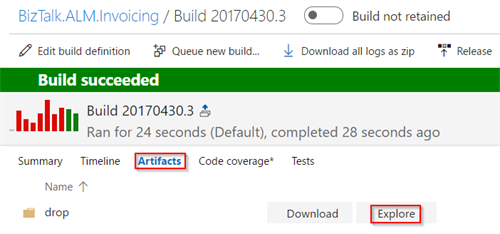
- You should see the deployment package (.zip) in the bin folder of the BizTalk Application Project.
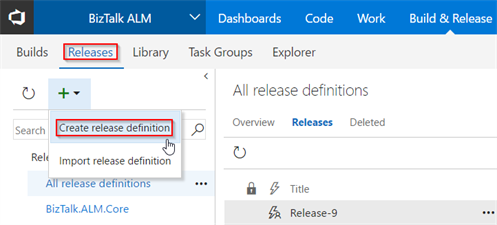
Create a release definition
We’ve created a successful build, that generated the required deployment package (.zip). Now it’s time to configure a release pipeline that takes this deployment package as an input and deploys it automatically on our BizTalk Server.
- Navigate to the Releases tab and click Create release definition.
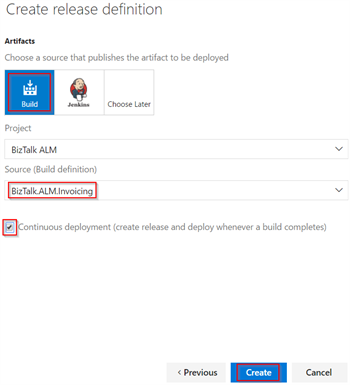
- Select Empty to start with an empty release definition and click Next to continue.

- Choose Build as the source for the release, as the build output contains the deployment package (.zip). Make sure you select the correct build definition. If you want to setup continuous deployment, make sure you check the option. Click Create to continue.
- Change the name of the Release to a more meaningful name.
![]()
- Change the name of the Environment to a more meaningful name.
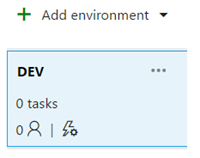
- Click on the “…” icon and choose Configure variables.
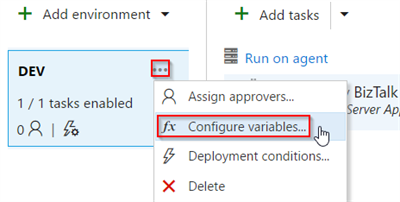
- Add an environment variable, named Environment. This will ensure that every occurrence of $(Environment) in your binding file, will be replaced with the configured value (DEV). Click OK to confirm.
![]()
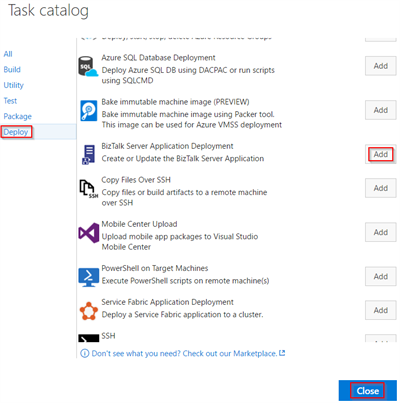
- Click Add Tasks to add a new task. In the Deploy tab, click Add next to the BizTalk Server Application Deployment task. Click Close to continue.
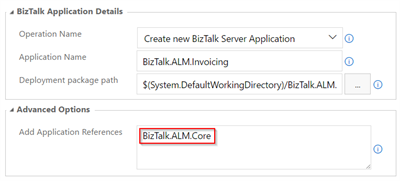
- Provide the Application Name in the task properties.
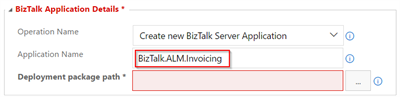
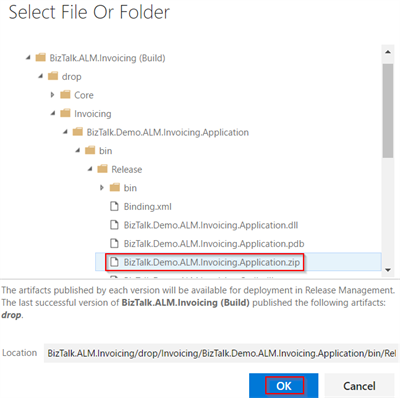
- For the Deployment package path, navigate to the deployment package (.zip) that is in the drop folder of the linked build artefact. Click OK to confirm.
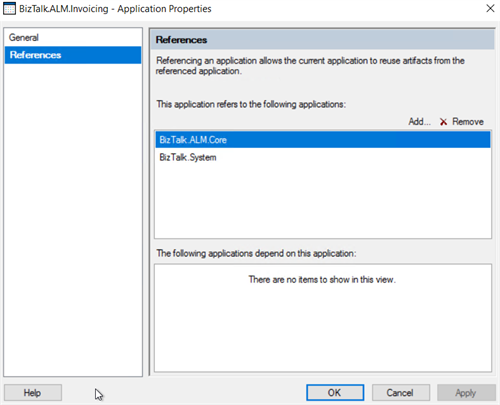
- Specify, in the Advanced Options, the applications to reference, if any.
- Select Run on agent and select the previously created agent queue to perform the deployment. In a real scenario, this will need to be a deployment agent per environment.

- Save the release definition and provide a comment to confirm.

Test continuous deployment
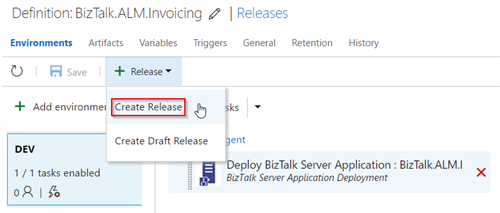
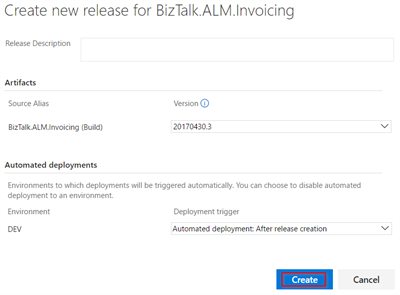
- Trigger now a release, by selecting Create Release.
- Keep the default settings and click Create.
- In the release logs, you can see all details. The BizTalk deployment task has very good log statements, so in case of an issue you can easily pinpoint the problem. Hopefully you encounter a successful deployment!
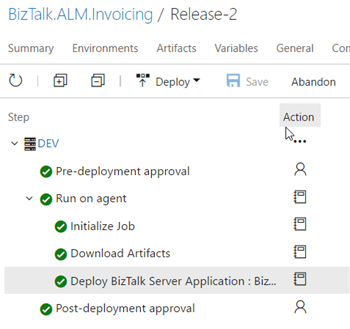
- On the BizTalk Server, you’ll notice that the BizTalk application has been created and started. Notice that the application version is applied and the application references are created!
In case you selected the continuous integration options, there will now be an automated deployment each time you check in a change in source control. Continuous deployment has been set up!
Wrap-up
Hope you’ve enjoyed this detailed, but basic walkthrough. For real scenarios, I highly encourage to extend this continuous integration approach with:
- Automated unit testing and optional integration testing
- Versioning of the assembly file versions
- Include the version dynamically in the build and release names
Cheers,
Toon
Subscribe to our RSS feed