Moving to Azure API management is more than seting up the documentation and the interactive console with a different look and feel. It gives us the possibility to take advantage of capabilities like throttling, usage analytics, caching and many more.
Here is the 4 steps procedure I did for this exercise:
- Virtualization layer definition
- Configure the Authorization Service (Azure Active Directory)
- Configure Azure API Management to register the Authorization Service
- Dev portal customization (optional)
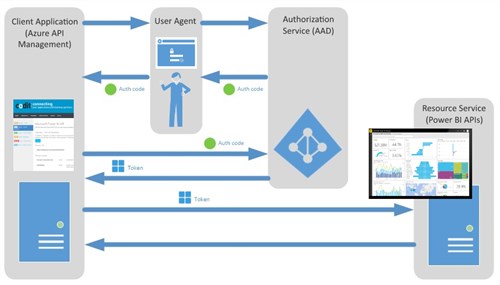
Power BI API calls are made on behalf of an authenticated user by sending to the resource service an authorization token acquired through Azure AD.
The diagram below shows the OAuth 2.0 Authorization Code Grant flow.
Virtualization layer
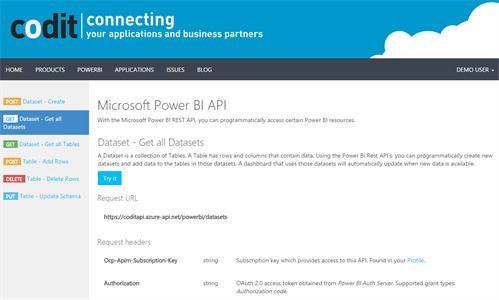
First thing to do is to create the API Façade on Azure API Management defining the set of the operations that will be proxied to the Power BI web service (https://api.powerbi.com/beta/myorg).
Since Power BI APIs don’t expose a swagger metadata endpoint, I manually created the API, added the operations, descriptions, parameters and representations (you can find the documentation here).
Then I defined my “Microsoft PowerBI APIs” product activating the visibility to the Guest group and with the Subscription Required option enabled and I added the API to the Product. With this configuration the API are visible to everyone so you can freely access to the documentation and on the other hand a subscription key is required to tryout the API using the built-in console.
The PowerBI APIs require an authentication token, so if we try to call the underline service at this point of the procedure we receive a 403 Forbidden answer.
Authorization Service
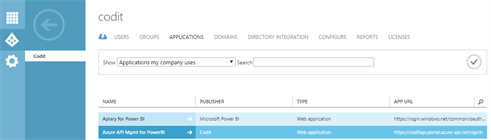
In order to provide a secure sign-in and authenticate our service calls with the Power BI APIs, we need to register our APIM built-in console in Azure AD as a Web Application. To complete this step you first need to sign up for the Power BI service and an Azure AD with at least one organization user.
Here you can find the register procedure.
The main parameters to be set up are:
- APP ID URI : Unique web application identifier. (e.g. https://coditapi.portal.azure-api.net/)
- Reply URL : This is the redirect_uri for the auth code. The value configure in this field will be provided by the API Management’s “Register Authorization Server” procedure (next section).
- Add the delegated permissions that will be added as claims in the authorization token.
Once the AD application is created you will get the ClientId and the ClientSecret values.
Note that the AD web application has been created on the Codit Office 365’s Azure AD so our setup will be valid only for our corporate Power BI tenant. Something different is the Apiary setup where I imagine that the Apiary WebApplication is enabled by default in every Office365’s AD.
Register the Authorization Service
In this step we register the Authorization Service in Azure API Management and then we setup our Power BI façade API to use the registered Authorization Service.
Here you can find the step-by-step procedure.
The main parameters to be set up are:
- Authorization endpoint URL and Token Endpoint URL.
- The Resource we want to access on behalf of the authenticated user.
- ClientId and ClientSecret. Specify the value we got from the AAD
Authorization endpoint URL and Token endpoint URL. Go to the Azure AD, select the application section and click the Endpoint button to access to the endpoint details.

The Resource service (Power BI) parameter must be specified as a body parameter using application/x-www-form-urlencoded format. This is the value of the resource parameter https://analysis.windows.net/powerbi/api

Common errors with wrong resource parameter are:
- An error has occurred while authorizing access via PowerBI: invalid_resource AADSTS50001: Resource identifier is not provided. Trace ID: {Guid} Correlation ID: {Guid} Timestamp: {TimeStamp}
- An error has occurred while authorizing access via PowerBI: invalid_request AADSTS90002: No service namespace named ‘{resourcename}’ was found in the data store. Trace ID: {Guid} Correlation ID: {Guid} Timestamp: {timestamp}
- An error has occurred while authorizing access via {APIM Authorization Server Name}
The “Register Authorization Server” procedure generates a redirect_uri that must be used to update the “Reply URL” value in the AD Web Application we set up in the previous step. If not, you’ll get this error at the first tryout :
- AADSTS50011: The reply address ‘{redirect_uri}’ does not match the reply addresses configured for the application: {Guid}.

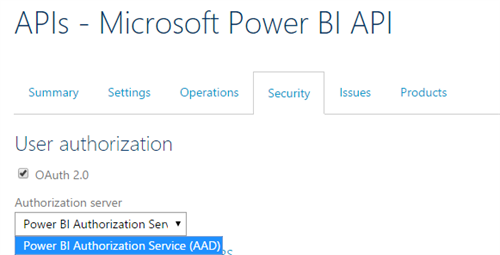
The last step is to configure our Power BI façade API to use the OAuth 2.0 authorization mechanism. Open the API, click on the Security tab and then check the OAuth 2.0 box and select the registered Authorization Server.
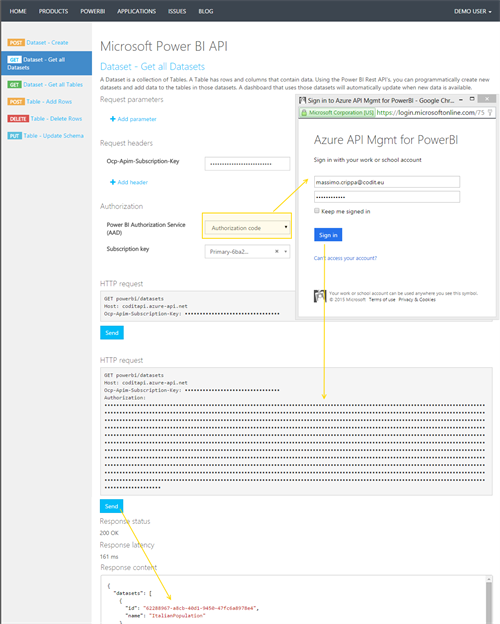
Try it out
The API Management built-in console allows us to quickly test the API.
Choose an API operation and then select “Authorization Code” from the authorization dropdown to access to the sign-in User Agent provided by Azure Active Directory. Once you have signed the HTTP request will be updated with the Bearer Token (the token value is not readable in the UI).
Now you can specify the desired values for the additional parameters, and click Send to test the API.
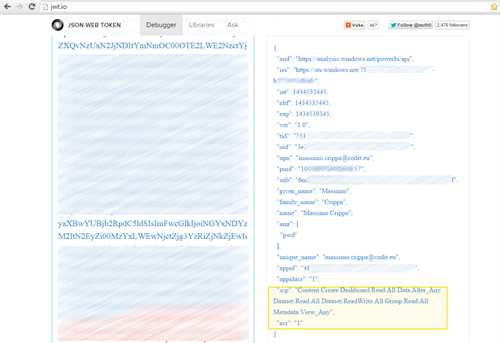
If you are interested to get access to the Bearer token, use Fiddler to intercept the Azure AD reply and then jwt.io to analyze the token content with all the properties and claims.
Developer Portal
As the Developer portal is a completely customizable CMS, you can set the look and feel following the branding strategy and add all the content you need to help to drive the APIs adoption.
In this case, I created a custom page (https://coditapi.portal.azure-api.net/PowerBI) dedicated to the Power BI APIs to collect some resources to facilitate the API intake like MSDN references and code samples.
Conclusions
As you can see, you can very easily use Azure API Management to connect to Power BI APIs on behalf of an authenticated user.
Moving to API management is not only like coming back home but also gives us the possibilities to take advantage of APIM capabilities like usage analytics to get insights about the health and usage levels of the API to identify key trends that impact the business.
Cheers!
Massimo Crippa
Subscribe to our RSS feed