There are a lot of posts available learning you how to create a singlebox FTP server on Microsoft Azure, using FileZilla Server or Internet Information Services… About a year ago, at the announcement of the general Availability of Infrastructure as a Service I tested a singlebox FTP server using FileZilla Server. The main benefit of FileZilla is it’s easy installation and configuration.
SingleBox configuration:
Following posts will guide you while creating a singlebox server using FileZilla:
http://digitalmindignition.wordpress.com/2012/11/28/azure-vm-role-with-filezilla-as-ftp-server
Azure Virtual machines need maintenance from time to time, you should always avoid a single point of failure,… Enough reasons for a High Available configuration.. This post does not consists of a step by step guide showing you how to create a VNET, VM’s, DFS,…
You need some experience with the Azure platform and Windows Server, I will help you putting the pieces together for a High Available FTP Server running on the Azure platform.
High Available Topology:
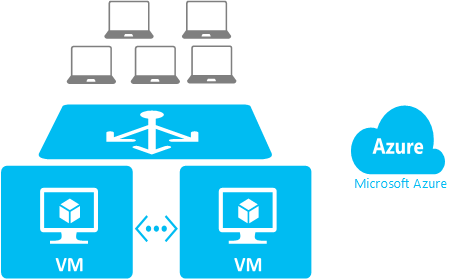
- Dedicated Virtual Network.
- Two Virtual Machines, working as AD, DFS and FTP server.
- Azure availability set.
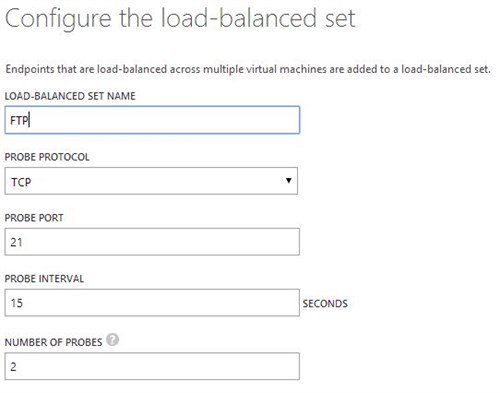
- Traffic will be routed through the Azure Load Balancer.
- I tried using a new VM feature, Public Instance IP’s for virtual machines. This feature is nice, but unfortunately the Windows Explorer client can’t handle the IP change behind the scenes. “The IP address supplied as part of the 227 response must be identical to the address of the FTP site the client initially connected.” (http://stackoverflow.com/questions/18478594/ftp-clients-filezilla-and-ftpuse-work-but-windows-explorer-cannot-engage-pasv-m).
PIP was announced as feature to support passive FTP, strange enough Windows Explorer can’t handle it. - I’m using DFS (Distributed File System) as a High Available network share. I tried a currently in preview new Windows Azure feature, Azure File Services, it’s very useful for shared storage between Virtual Machines. IIS and FileZilla are not able to work with this feature, so it’s not useful for our purposes.
- Create a new Virtual Network, choose a region, create an affinity group,…
- When your Virtual Network has been provisioned, create two new Virtual Machines and add them both to the VNET.
- When creating the first VM, create an availability set. When creating the second VM, join the availability set you just created.
- Use the same cloudservice name for the second VM as the one you defined at creation time of the first VM.
- When creating a new VM, the first thing you should do is changing the Windows Update and UAC settings.
- Attach an empty datadisk to both Virtual Machines and format it. (Will be used for DFS and FTP file storage)
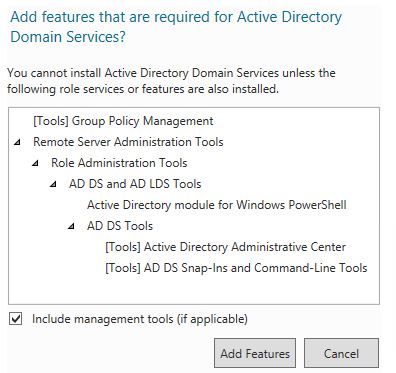
- Install AD on both virtual machines. (http://azure.microsoft.com/en-us/documentation/articles/active-directory-new-forest-virtual-machine)
- Create an admin user in the domain for future usage. (Domain admin).
- Set the private IP of the first VM as DNS server in the VNET.
- Add the second VM to the domain and promote it to a Domain Controller.
- Add the private IP of the second VM as DNS server in the VNET.
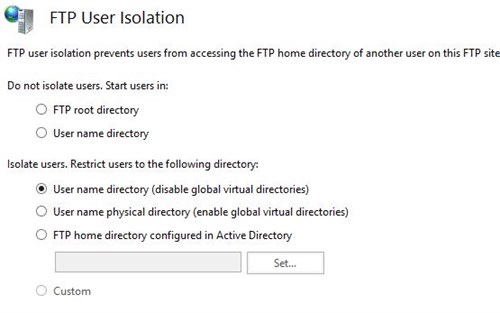
FTP and IIS:
- Install IIS and FTP service on both servers.
- Configure the FTP services (publish FTP services).
- Create a DFS share and set up Shared IIS config (you can use a shared config when doing the initial setup, when you go live you will need to disable it due to the port settings).
https://community.rackspace.com/products/f/25/t/491
http://technet.microsoft.com/en-us/library/jj134201.aspx
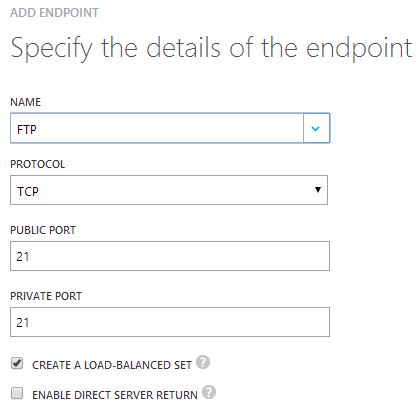
Now here is where the magic happens to enable passive FTP. I was not able to find any solution for this on the internet, but following did the trick. (You could use the Public Instance IP (PIP), but then your Windows Explorer clients will not be able to connect.)
You open a specific range of Passive FTP Ports on the first VM, and another specific range of ports on the second server. This way FTP traffic will always be routed to the the right server.
To avoid a lot of manual work you can use powershell to open a range of ports:
Import-Module azure
Add-AzureAccount
Select-AzureSubscription “yoursubscription”
$vm = Get-AzureVM -ServiceName “yourvmservicename” -Name “yourvm”
for ($i = 6051; $i -le 6100; $i++)
{
$name = “FTP-Dynamic-” + $i
Write-Host -Fore Green “Adding: $name”
Add-AzureEndpoint -VM $vm -Name $name -Protocol “tcp” -PublicPort $i -LocalPort $i
}
# Update VM.
Write-Host -Fore Green “Updating VM…”
$vm | Update-AzureVM
Write-Host -Fore Green “Done.”
Now you can specify the machine specific range in IIS per machine, secondly you need to specify the public IP of your cloud service in IIS. Note, deallocating both Virtual Machines will make you lose your Public IP. (Since the latest Azure announcements it’s possible in Azure to reserve your IP).
Don’t forget to allow FTP through your Windows Firewall!
Subscribe to our RSS feed