What is an AKS add-on?
AKS add-ons provide the ability to activate specific functionalities on your cluster. These functionalities encompass integration with Monitoring, Azure Policy, KeyVault secrets provider, KEDA and more. However, unlike the usual installation through helm charts, AKS addons do not offer additional configuration options.
Pros/Cons
➕ Add-ons are tested and verified to ensure compatibility with the supported versions of AKS. This contributes to the overall stability and reliability of the AKS platform.
➕ The AKS add-on model simplifies the deployment of Istio by providing a pre-configured and optimized installation experience. This approach saves time and resources, allowing developers to focus on building and deploying their applications rather than spending effort on the underlying infrastructure. Add-ons are extremely easy to install (maybe too easy), so it just takes one flag configuration and all the plumbing is done by Microsoft.
➖ Major and minor upgrades are rolled out together with the AKS cluster upgrade, so therefore if you want to leverage a new Istio/Keda/else feature you need to upgrade the cluster. If the new version has not been included in the cluster upgrade you need to wait for the next AKS versions. But don’t worry: the AKS team planned to provide the ability to trigger minor version upgrades for Istio (without cluster update) and to choose between in-place or canary upgrades for Istio components.
Istio add-on for AKS
Istio is a widely adopted service mesh that provides different features like Traffic Management, Service-to-Service security, observability and more. In this post, we will focus on how to get started and have a basic understanding of how the Istio traffic management works.
- Register the AzureServiceMeshPreview feature and the provider it belongs to. See 00-prerequisites.sh
- Create a new AKS cluster by adding the ‘ –enable-asm’ flag to enable Istio. See 01-create-aks.sh
By enabling that single flag, Microsoft takes care of provisioning, scaling, and configuring the Istio control plane for us. This ensures that the control plane is properly set up and optimized for your AKS cluster without requiring manual intervention.
Once the provisioning procedure is complete, we can check a couple of details about the installation. The add-on runs a couple of Helm charts under the hood: we can then check the chart details by running the “helm list -A” command and get more details about the release with “helm get manifest {release_name} -n {namespace}”

The asm-istio-base release created two namespaces : aks-istio-ingress (empty) and aks-istio-system, where the istio pilot resources are deployed by the discovery chart. To get further details on what has been created in the aks-istio-system namespace you may run this command “kubectl api-resources –verbs=list –namespaced -o name | xargs -n 1 kubectl get –show-kind –ignore-not-found -n aks-istio-system“.
Install a test application
To proceed we need to deploy some workload to the cluster. The 02-deploy-app1-podinfo.sh execute a couple of Helm charts to deploy the PodInfo example application in the pinfo1 namespace along with a debug pod. The podinfo application consists of two instances of the front-end, one instance of the back-end and one instance of redis.
The front-end pod contains a single container (no mesh).

To test the application works as expected you can use port forwarding and test the frontend at http://127.0.0.1:8080/
kubectl -n pinfo1 port-forward deploy/frontend-podinfo 8080:9898or get a shell to the running debug container and execute a CURL command from the shell to invoke the backend API.
kubectl exec -it curl-pod -n pinfo1 -- sh

curl -k http://backend-podinfo.pinfo1.svc.cluster.local:9898/
Install the Istio Ingress
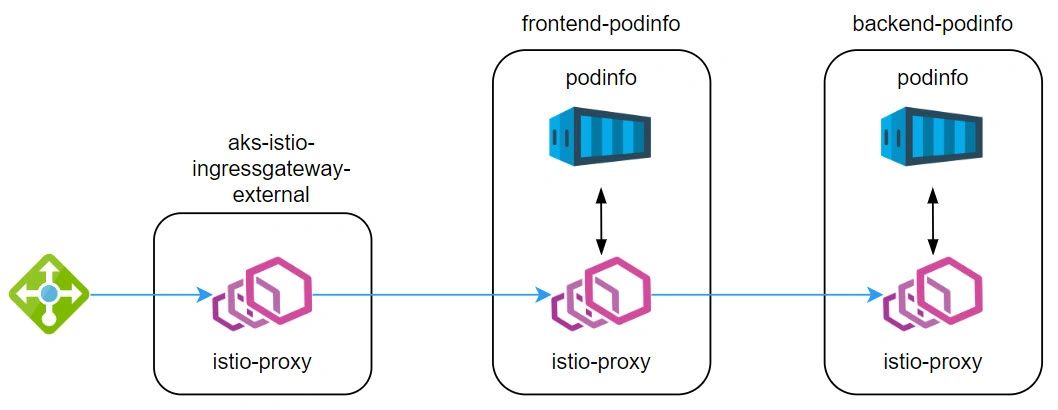
Now, to expose a service outside the cluster we can install the Istio Ingress controller by executing the “az aks mesh enable-ingress-gateway” command as per 03-enable-ingress.sh. To keep this exercise as simple as possible, we will go for a public cluster with an external gateway. As a result, the ingress gateway (a pod with the istio-proxy image) will be deployed in the aks-istio-ingress namespace.
Note that Istio uses the Envoy proxy as its core data plane component meaning both ingress gateway and sidecar components are Envoy-based.
Configure the request routing
Now we are ready to define how the requests are routed to our services. In our case, this means how to route traffic to the podinfo frontend. To achieve that, two Istio resources must be deployed:
- a Gateway to describe the AKS load balancer at the edge.
- a VirtualService that describes how to route the traffic arrived via the Gateway previously defined.
You can find the Gateway and the VirtualService deployment on this script 04-config-ingress.sh. In this example, we use nip.io to implement a host-based routing. By requesting the address http://pinfo1.20.13.64.179.nip.io/, the request will be routed from the Istio Ingress directly to the frontend service. So far so good.
Label a namespace and test the mesh
Let’s now create a new namespace named pinfo2 and add a new label with the ” kubectl label namespace $NS istio.io/rev=asm-1-17″ command (05-label-ns.sh). Next to that, deploy a new instance of the podinfo in the new namespace (06-deploy-app2-podinfo.sh) and configure the ingress by deploying Gateway and VirtualService (07-config-ingress-app2.sh).
Note that for every pod in the labeled namespace, Istio injects the proxy configuration at pod creation time using an admission controller. As a result, every pod that belongs to the pinfo2 namespace will have an Istio sidecar proxy injected alongside the application container.

Now the traffic flow is changed and my requests are proxied by Istio, responsible for intercepting all inbound and outbound traffic of the application container.
I can test my application at the following address http://pinfo2.20.13.64.179.nip.io/ and get the same result as the first test, but in a meshed way.
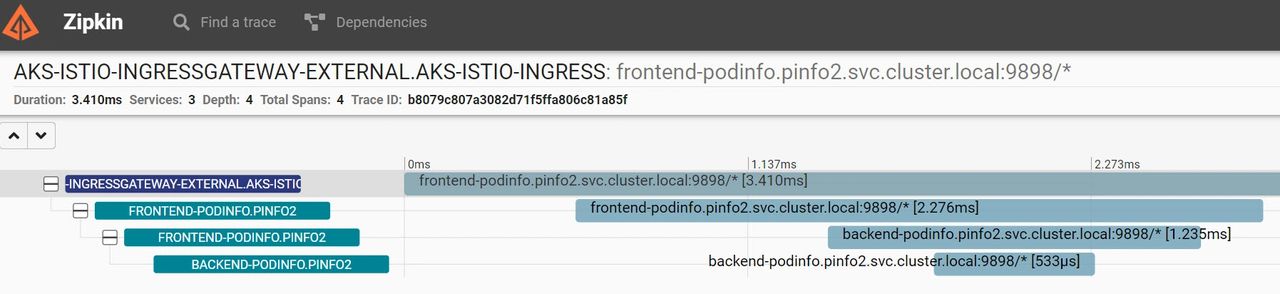
Now that the traffic is flowing through Istio, we can leverage the integration with popular observability tools to gain insights into the behavior and performance of our services. As a last step in this exercise, I have installed Zipkin as per 08-zipkin.yaml and gained access to the Zipkin dashboard via port-forwarding using the “istioctl dashboard zipkin -n aks-istio-system” command.
Effortlessly, I have gained access to the tracing data! I can now get the info I need to identify bottlenecks, troubleshoot issues, and optimize my application.
Conclusion
By offering Istio as an add-on for AKS, Microsoft has made it easier for developers and organizations to adopt and leverage the benefits of Istio without the need for complex installation and configuration processes. This lower entry barrier facilitates the adoption of Istio by reducing the effort and technical expertise required to get started with it. This democratization ultimately accelerates the adoption of Istio on AKS-based solutions.
Subscribe to our RSS feed