For a migration project we did recently I had to move the existing role link implementation to a new environment. Role links was one of those things I studied for preparation of my BizTalk certification exam and then never had to implement into a real life scenario until now. I decided to write this blog to freshen up the details and try to give an overview on how to implement role links into real life scenario situations.
You can see role links as an abstraction layer between orchestrations and trading partners. Role links allow you to dynamically determine the trading partner for interaction based on message content, database values, basically on anything you can think of.
A detailed description of Role Links and Service Link Roles can be found in the BizTalk online documentation dealing with role links.
Scenario
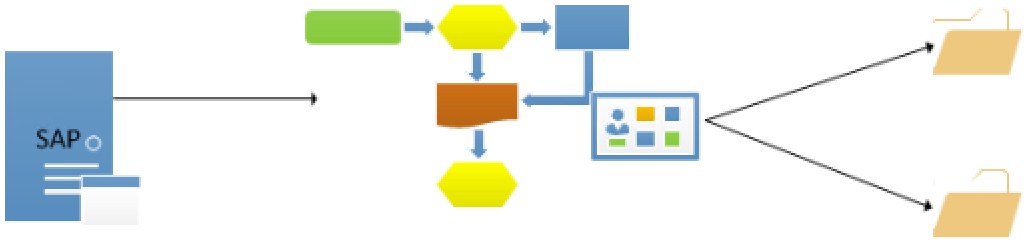
In our B2B scenario we will send invoices from a single supplier (SAP) to multiple receiving parties (XML). Based on Xpath values inside the IDoc we will decide where to send the invoice to. For the moment I will use the filetransfer protocol to demonstrate the use of role links. But at a later stage if we want to switch protocol for a certain party, we only need to use the BizTalk Administration console to update the send port for that specific party. We don’t need to change our business processes, connection settings or anything else inside our orchestration.
And there is where the real power of role links is…
Initial setup
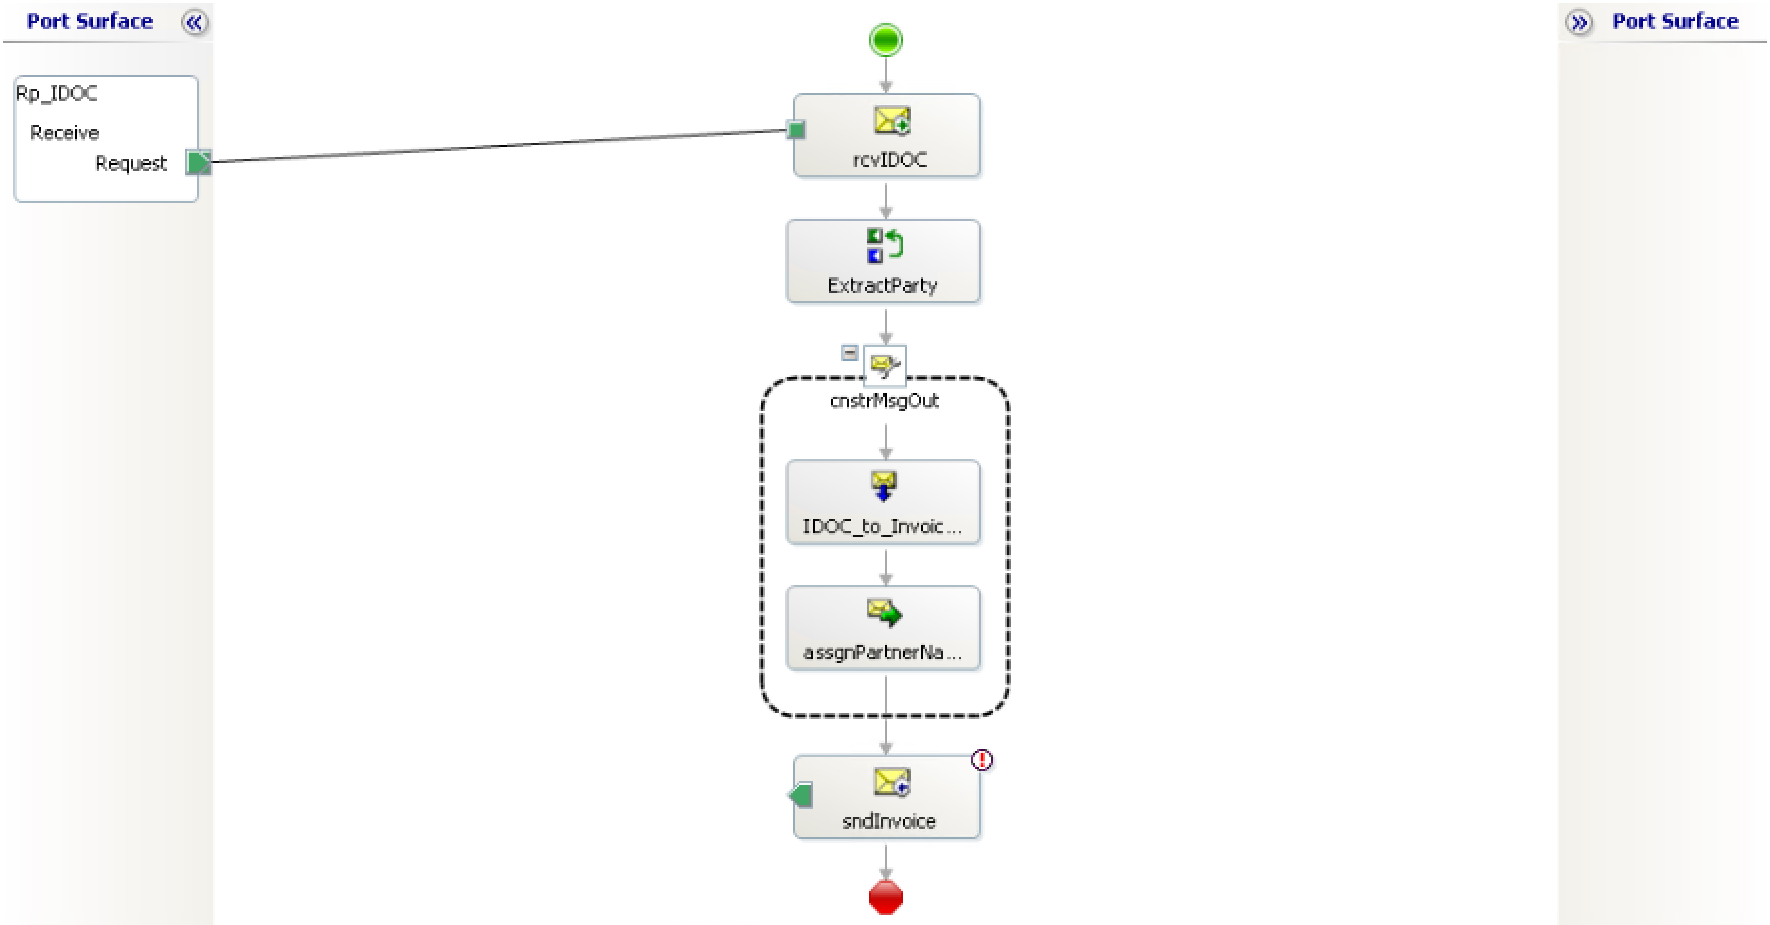
For this scenario I created the orchestration below. The orchestration is filtering on a specific IDoc type in the receive shape filter.The next step is extracting the necessary information from the message to dynamically decide to which party we will send the message.
After we extracted the values we will execute a mapping and assign the party name to the role link. How to assign the party name to the role link will be explained in detail later in this blog post.
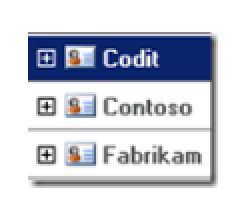
A number of parties were created for this scenario:
- Three parties were created, one for each business partner receiving invoices.
- For each party a send port was created and assigned to their specific party, this will be necessary to correctly configure the role link in a later stage. The role link will automatically know which send ports are available for that specific party.
Note: In this scenario we extract the name of the party from a field inside the incoming message, but it’s perfectly possible to extract the name of the party from a combination of fields, database parameters, BRE,… Also assigning the role link is not limited to only the partyname. It is perfectly possible to use identifiers, qualifiers, ID,… as parameters to dynamically resolve the party.
In this example we also used parties without an agreement, also here it’s perfectly possible to set up agreements X12, EDI, AS2,… and use this in your role link scenario. Basically the role link will resolve based on the Party, not on the agreement/protocol settings.
You can download the full demo application here.
Creating the role link
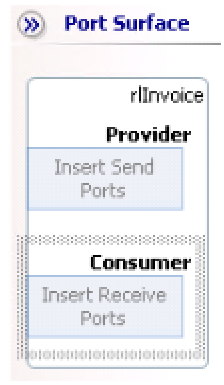
Right click the “Port Surface” in your orchestration designer and choose “New Role Link…”

The next two steps are all about configuring a name and a type for the new Role Link. No rocket science in these steps.

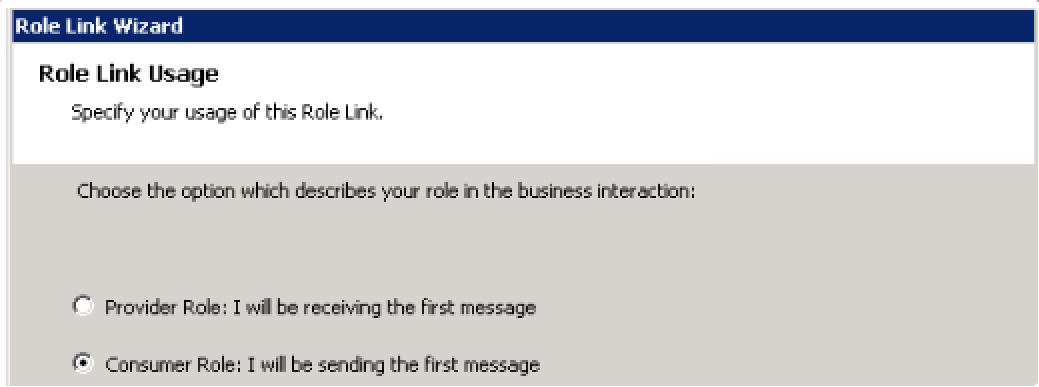
In the next step and last step of the wizard you have to choose your “Role Link Usage”
There are two possible roles inside an orchestration:
- Provider Role
Also known as the “implements” role, this role will we used to receive and process messages. - Consumer Role
Also known as the “uses” role, this role will be used to send messages.
In this demo scenario we will act as a “consumer role” because we are the initiator of the flow and we will be sending the first message.
The result of wizard is shown below. This Role Link can now be used to start adding port types. The only difference here is that you do not need to specify any binding like you would normally have to do when adding a configured port to your orchestrations.
Create a port type and connect the send shape of your outgoing message to the port type you just created.
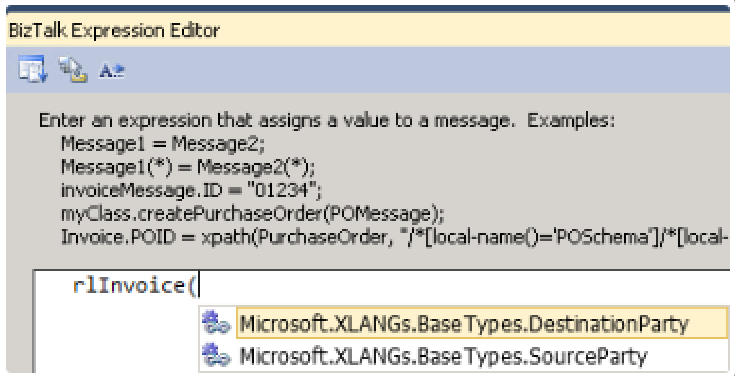
Assign the partyname to the role link
All good to go you would think, but if you try to build your project now you would get following error:
“uninitialized ‘uses’ servicelink ‘<yourRoleLink>’”
This error basically means you are trying to use a Role Link with no value assigned to it, this will have as consequence that the Role Link at runtime will not be able to decide on where to send the message to therefore you get this build error.
To fix this error and configure the Role Link we need to explicitly set the Destination party in our orchestration as shown below.
The “sPartyName” variable contains the value we extracted from the incoming message as explained in the “Initial Setup” part of this blog post.
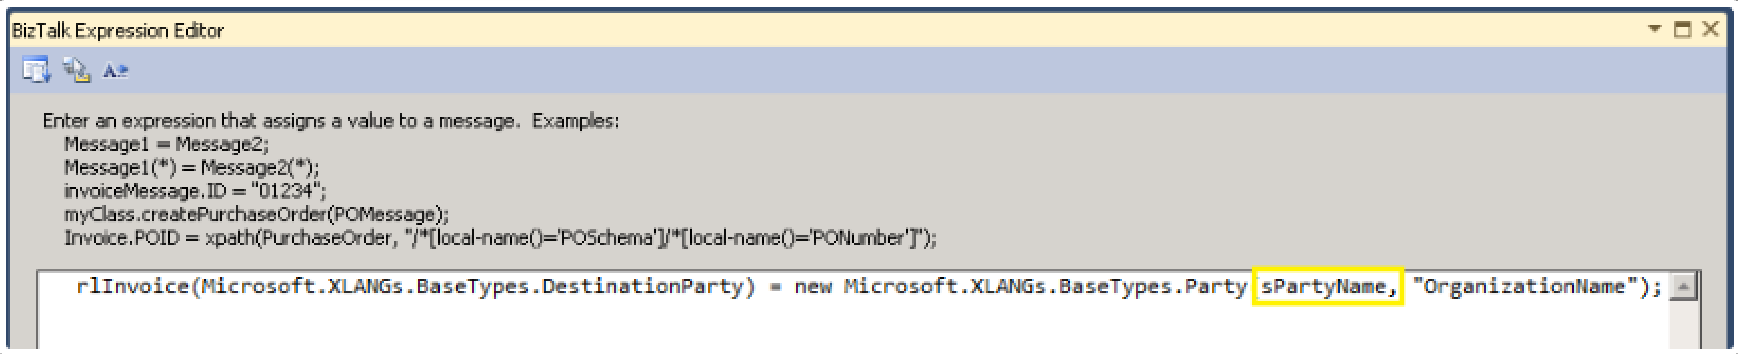
Once you assigned a value to the “DestinationParty” of the Role Link, you can build and deploy your project.
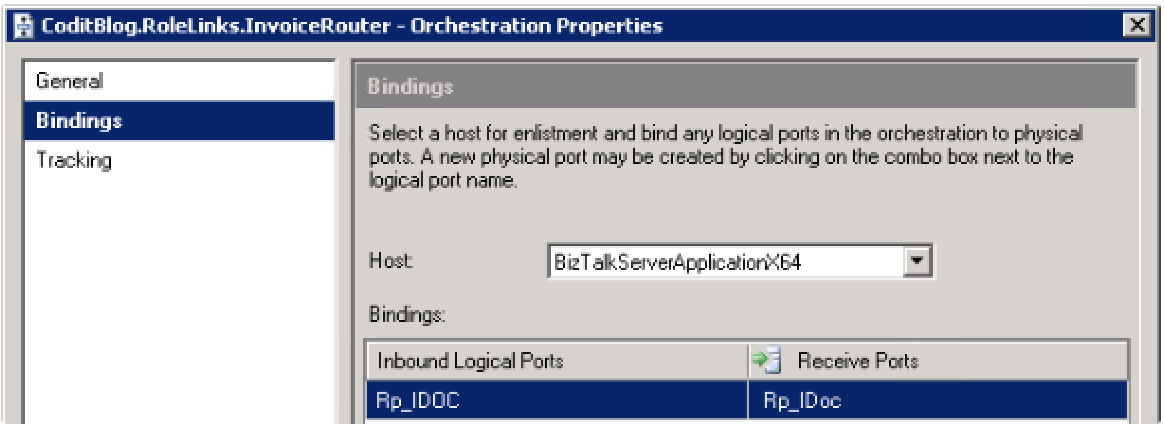
Configuring the role link in the BizTalk administration console
The first part of the configuration part in the BizTalk Administration Console will be to bind the receive port to the orchestration we created.
Please notice that there is no send port available in this configuration part, this configuration part will be done through the Role Link configuration.
Once you configured your orchestration it’s time to configure the actual Role Link. You can configure Role Links by accessing the Role Links inside your BizTalk Application as you can see below.
Please notice the name of the Role Link is “Provider” this is because we kept the default configuration in our orchestration. Off course this name is completely configurable.
Note: A good practice is to set the name to something meaningful, so you know at the time of configuration what the role link is used for. It often happens that there are multiple role links in one BizTalk application, which can get confusing sometimes.
If you double-click the role link name you will have following screen. And this is where all the magic happens! Here you can add parties that will communicate with your orchestration. Click on “Enlist” to start adding parties.

If you have clicked on “Enlist” you will see a popup that contains all of your parties, check the checkbox to add the desired parties to your Role Link. In our case we will add the “Contoso” and “Fabrikam” parties.
Note: Because we will only enlist the Contoso and Fabrikam party in this scenario, all messages arriving with destination “Codit” will throw following error when trying to initialize the role link in the orchestration.
“Destination party not found while attempting to send message ‘msgOut’ to (Codit, OrganizationName)”.

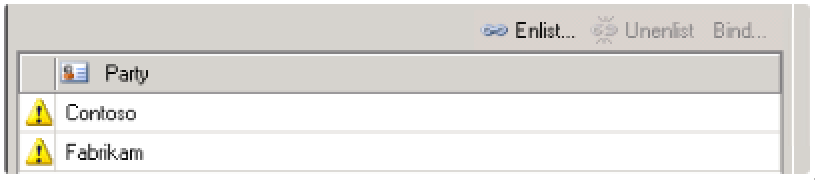
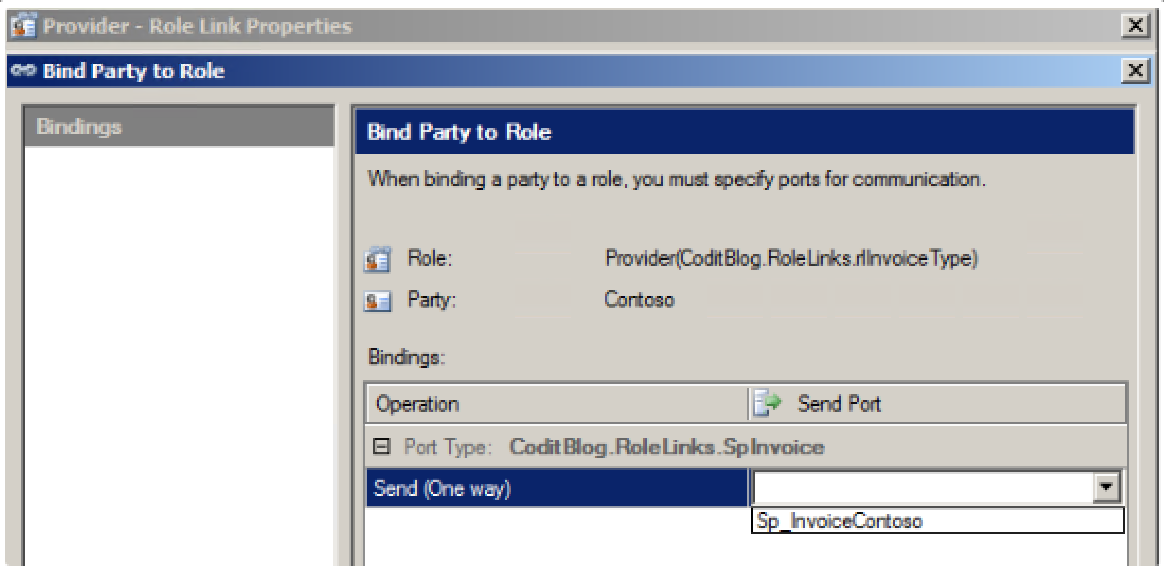
Once you have selected your parties and clicked on “OK”, you will get following screen. Please notice the exclamation mark indicating there is still some configuration missing for your role link. Double click once of the selected parties.
Following screen will popup, in this screen we will bind the Party to the Role, please notice the wizard automatically detects the correct send port to use for this Role.
If you have bound all the selected parties to the Role you are ready to test.
Conclusion
Role link are a very cool and powerful feature within an orchestration to “dynamically”determine where to send data to and this with all setting/configuration available for modification inside the BizTalk Administration Console.
In the scenario above we used the file transfer protocol, but if we would decide to change this to for example HTTP the only thing we need to do is create the necessary send ports and assign it to the parties and role link (100% configuration through BizTalk Administration Console).
Now imagine doing the same if you would have chosen the option of implementing a dynamic send port inside your orchestration….
In the future when doing analysis or architecture for a new project, I will definitely keep role links into mind as I feel it is one of those underestimated features in BizTalk.
As already stated in this blogpost, you can find the full source code/example files and bindings here.
Cheers,
Colpaert Glenn
Subscribe to our RSS feed